Followers

Showing posts with label weathered wood. Show all posts

Sunday, June 19, 2016

Time waits for no man

Hi all,  back again from my vacation in USA and I had a great time, meeting friends and seeing so many beautiful things. I did miss my craftroom a bit tho,  life has been a bit busy last week an a half since I've been back, plus a nice jet lag to deal with the first few days. I did want to enter Andy Skinners Time challenge so started yesterday evening on a last minute project. It was kind of a struggle cuz things never work the way you imagined them, but made it on time :-)


Ok here the products used, all Deco Art ofcourse, I love there paints and mediums :-)


Americana Matte Varnish, Americana Acrylic paint in Lamp Black and True Red. Americana Decou-page matte, Deco Art Media Carckle paste, Deco Art Media Texture Sand and Gesso, Deco Art Media fluid acrylics in Quinacridone Gold (love the paint, hate the name, breaks my tongue lol), Cobalt Teal Hue, Carbon Blac, Burnt Umber.  Deco Art Media antiguing cream in carbon black.  Americana Weathered Wood.


I found the hourglass last Friday in a shop called Hema  (Dutch shop that sometimes has real cool stuff) it was on sale for 1 euro :-)   but ofcourse brand new and shiny. Fixed that..., using a mix of Decoupage and burnt umber acrrylic fluid and a bit water, used soe quin gold for accents, I think it turned out great, was an experiment LOL, any way it started out like this
and now I altered it into this ;-)


The skulls are palstic beads and I put them on the sticks (the ones you use for plants in the garden if they need support no idea what they are called) and gessoed them and rusted them.

The circle parts they are attached too are made of a cardboard box, just cut out a circle shape and some cardstock circles to do the painting and stamping on the cover the cardboard


They are duble sided ofcourse because both sides are visable and because you have to turn the hourglass, the bottom part needs to be the same as the top :-)

I used weathered wood and crarckle paste to get the aged effect . the All Seeing Eye (my fave stamp of the Curiosity set) was stamped using Archival jet black ink , the other side is a clear stamp of a clock, no idea what brand it is.

The glueing everything togehter was a bit hard but it worked :-)  I like the result anyway.

I will enter this in the following challenges:

http://andyskinnerorg.blogspot.nl/2016/05/time-challenge.html

http://leftofcenterchallenges.blogspot.nl/2016/06/challenge-135-tic-tac-toe-and-two.html I went LOC

Saturday, December 19, 2015

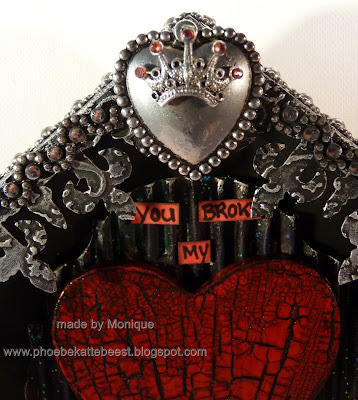
Broken Heart Shrine

Sometimes all you can do with a broken heart is make it a little shrine.......


Deco Art products used:  Metallic Lustres in Silver Spark, Black Shimer. Traditions paint in Raw Umber, Phtalo Green blue, Naphtol  Red Light. Craft Twinkles in Christmas Red and crystal. Americana acrylics in Lamp Black.  Matte Varnish and Gesso.  Weathered Wood Crackle medium and Media Crackle Glaze. Antiquing cream in black

Other material used: cardboard (piece of a box) a wooden house shaped frame, a key , chipboard.  Tim Holz dies, a crown charm a metal heart and a wooden heart. Rhinestones and ribbon. A Sharpie and Distress Ink in Barndoor Red.


You can find this shrine in my Zibbet shop here

First I die cutted the chipboard into the iron gate and the background for the heart from the cardboard box and gessoed everything.


Next I painted the wooden frame and heart lamp black, the Iron gate dies alse were painted black and embossed .the piece of cardboard was painted in Raw Umber, Phtalo Green blue and was given some sparkle using Craft Twinkles in Crystal.

I gave all metal pieces and the emobossed iron gate die cuts a vintage look using the Metallic Lustres.

Painted the word love on the key red and added Craft twinkles in christmas red. Put Rhinestones on the crown and the key.


The wooden heart got a layer of Weathered Wood over the black paint and the top layer is Naphtol Red Light. After the crackle appeared and the paint was dry I varnsihed the heart and let dry again. Next layere is Media Crackle Glaze and when that dried I rubbed some balck antiquing cream into the cracks and wiped away the acces. Used matte  Varnish to finish the heart,


The senti came from the internet and was handwritten on a piece of cardstock using a Sharpie, added red using the distress ink and next step was glueing the all parts in and on the frame. I decorated the edges and sides of the shirne using a ribbon with metal decorations on it.


 I will enter the following challenges

http://sandee-and-amelie.blogspot.co.at/2015/12/steampunk-winter-special-challenge-part.html

http://creativeartistemixedmedia.blogspot.co.uk/

http://mixedmediamc.blogspot.de/2015/12/mixed-media-monthly-challenge-19-silver.html

http://alteredeclectics.blogspot.co.uk/


Saturday, April 25, 2015

Calaf and bling on a canvas


Deco Art products used: Americana Acrylic Gesso, Weathered wood, Matte Varnish,
Americana Acrylic paint in Lamp black, Dazzling Metallic in Venetian Gold, Craft Twinkle Crystal,

Digi Calaf by Rick St.dennis, coloured using Faber Castell Polychromos, Stickles and rhinestones.


Loads of bling and sparkle on this canvas, I don't use much of the bling normally, but thought to get nuts and get all the bling out.

I started by gessoing the canvas, next is a layer of Venetian Gold, let dry and apply Weathered wood, let dry again and add the black top layer.


When the crackeling is done and the paint is dry, add a layer of  matte varnish and let dry,  take a fan brush and apply a thin layer or Craft Twinkles.

Meanwhile colour the Calaf digi and cut it out, Add the stickles to the hat and clothes and let dry.

Glue all bling and feathers on the canvas and glue the digi to the canvas, next add some rhinestones to the colar and head band.


I also gave the guy  navel piercing,  :-)


Check out how you can get the 3 free practise sheets in this video,  for more videos about colouring and other how to's check the how to blog here


I will enter the following challenges

http://cccdigicreations.blogspot.co.nz/2015/04/challenge-23-add-some-sparkle.html

http://kleurenmetpotloden.blogspot.nl/p/challenge_16.html

http://allsortschallenge.blogspot.nl/2015/04/week-308-bring-on-bling.html

Thursday, August 14, 2014

Mermaid canvas

Hi all, I am back again.


I started this canvas early May, but some tings got in the way so I could only finish it just before I let for the USA. I had planned to do a tutorial about this and I did make pics along the way.......but .....somehow I lost a part of the pics.

so I will try to talk you throught the part where pics are missing, sorry


Deco Art products used:  Elegant Finish Metallic Glaze (in Medieval Gold and Old World Patina)
Weatehered Wood Crackle Medium, Texture Fierro in Green Gold, Decoupage Matte, Americana Acrylic paints in colours: Driftwood , Antique Mauve and Colonial Green. Metallic Lustres in colours: Gold Rush and Iced Espresso. I also used Acrylic Gesso to prepare the canvas for painting. And a Matte Varnish.


The digital image used is Aquarella, by Rick St.dennis. for embellishments I used shells, drift wood some pearl beads and a net. You will also need paper towels.


First Gesso the canvas, while drying start colouring the image, I usually use the drying time in between paint layers to do some colouring.


When gesso has dried paint the canvas gold using the Elegant Finish Metallic Glaze, you may need multiple layers .Let dry in between. When  dry apply a layer of Weathered Wood Crackle medium, let dry.

take the 3 colours Americana acrylics and put some paint on a craftsheet. Take some papertowel and make a puff.
Now it's gonna get messy lol,  dabb the papertowel puff in the paint, while doing this turn the puff a bit so paint will be a bit mixed, but careful not to make mudd. Then immediately dabb to the canvas and keep turning the puff while dabbing. You might want to practise this on a scrap piece of paper. You want to create a marble like look. Change papertowel puffs if the paint will get to much to be one colour. See pic below, that is the result you want. Work fast because if you over do the paint the weathered wood won't work.


Let dry and let the crackle start, when the canvas has dried you have a marble look finish, with cracks, throught the cracks you will see some gold. Protect it with a layer of matte varnish

From here the pics are missing, but next step is easy. Paint you embellishments to match the canvas, using the Elegant Finish Metallic Glazes and the paint. Let dry .


cut the digi out and glue it to the canvas

Take the Texture Fierro and a palette knife to apply it round the edges of the canvas to create a frame, don't forget the edges of the canvas. Let it dry and crack. Add some Metallic Lustres to some of the raised areas.


glue the embellishments in place (try to put the net in between, under and over some of the embellishments), for the loose ends of the net, use Decoupage Matte on the net to make sure it stays where you want it. Let dry.

when theDecoupage Matte and glue  is dry turn the canvas around so the backside ist up, Attache the remaining loose ends of the net on the back of the canvas using Decoupage Matte or glue. Let it dry and you are done.


I will enter this in the folowing challenges


http://cagichallenge.blogspot.ca/2014/08/fish-or-fishing-challenge-this-week.html  mermaids are a fish aren't they, well partly anyway


Monday, March 24, 2014

Macabre Monday # 184 Skullduggery

Our new Macabre Monday theme for the next two weeks:

SKULLDUGGERY

The word 'skulduggery' is a noun,
meaning underhanded or unscrupulous behavior; trickery.
Notice how we purposely misspelled it with two "l"s?
We're looking for SKULLS, but if you can manage to work
both the definition, and the skulls in,
then you have a win, win project on your hands! 

So, just to be clear, we want to see skulls. Lots, and lots of skulls


Also a new Minion in the Dungeon, Fiona Randall, go check out her awesome work

sooooo skulls it is, I made a skull shrine


Deco Art products used:
Dazzling Metalics Venetian Gold
American Acrylics, colours: Mocha, Sable Brown, Sand, Lamp black, Traditional Burnt Sienna
Americana GessoWeathered Wood Crackle MediumDura Clear Matte VarnishGlazing Medium
Elegant finish Metallics  in Renaissance Brown and Emperors Gold Metallic Lustres in Iced Espresso, Copper Kettle,  silver spark,  Black Shimmer.
Texture Fierro  Iron Green
The skull  is a Smeared Ink digi
The rubber stamps are from the Stempelwinkel, the skull/cross bone is a clear stamp, brand unknown
the shrine is made using the vintage cabinet card die and card board, and the fence is the die in the pic


I die cutted (is that a word?) the vintage card 6 times, 2 were given the same treatment as the Dragon Book, see how to here (as a matter a fact I die cutted those 2 from my test piece. I tried this aging  technique on the cardbord first before using it on the book. So glad I saved it cause it saved me a lot of work for this LOL)
The 4 other vintage cabinet cards were glued together. I glued one of the ages cards on the top (aged side up, doh!). Cut the hole out using a ruler and craft knife, safe the aged piece you cut out.
glue the other aged card on the back, (aged side to the back, so you see both aged sides)
see pic
the square aged piece you cut out the first card will be glued in the hole, aged side up, now all sides have a nice aged look and only the sides have to be aged (inside the hole and around the card) but first stamp all the skullies.


To age the sides I used Texture Fierro, apply using a palette knife. Let Dry and add some Elegant Finish Metallics
The flower is also a Tim Holtz Die, same as the ones I used for the Dragon Book, this was a left over from that I explained how to make them here.
The skull is printed twice , cut out and layerd using foam tape to create some dimension, distressed with glossy crackle accents and walnut stain distress ink.

that's about it, go check out the other minions blogs to see the amazing skull projects they made


I will enter the following challenges
http://leftofcenterchallenges.blogspot.co.uk/p/loc-1st-anniversary-challenge-starting.html

Thursday, February 20, 2014

Steampunk canvas using RSD Insane Hatter


Hi all, I've been working on a canvas using the Rick St. Dennis Insane Hatter, and turned it into a Steampunk canvas using all kinds of metal pieces, DecoArt products and some Tim Holtz dies.

Supply List:Digi stamp" Insane Hatter" by Rick St. Dennis MFA

DecoArts products:
Americana Acrylic paint Lamp black
Americana Acrylic Gesso
Dazzling metallic paints : copper and emperors gold
Glamour dust fine glitter paint; Sizzling red
Americana Weathered wood crackle medium
Texture Crackle (neutral)
Metallic Lustres: Iced Espresso, Copper Kettle and Black Shimmer


Tim Holtz Alterations : Hardware Findings and Gadget Gears
Rubber stamps Steampunk plate 1 + 41 by Kicostamps
Clearstamps by Chronology 


Embellishments:
Plastic frame, the small light bulbs,the spring and the bolts and rings came from dear husbands garage ;-) but he probably bought them in a hardware store :-)
There are some foam roses and a small playing card, letter beads some hat pins and and old key and wooden spool with some brown thread. The iron flowers are home decorations and the big gears are plastic parts from an empty tape runner that I took apart. 
The small gears on the Hatters hat are old watch parts 


how to:
The Mad Hatter is a Rick St.dennis MFA digi stamp to be found here: http://www.zibbet.com/Rick1949/artwork?artworkId=2153906. The digi is coloured using Caran d'ache Luminance 6901 pencils and then cut  out.

The canvas was prepared using the Gesso, then a layer of emperors gold paint. The weathered wood was applied and the top layer is lamp black.
When the crackling was done and dry the frame was made using texture crackle, applied using a pallet knife, when that was dry it was painted lamp black.

The gear rubberstamps and clearstamps are stamped using copper acrylic paint. The copper paint was also used to add the metallic aged look to the crackle frame.

All embellishments were given an old worn look using the metallic lustres, the foam roses were allready red but I gave them a layer of sizzling red glitter paint to give them some shine


some detail pics


The cool thing is that this canvas will be published in Just Steampunk Magazine Volume 5, I asked if it was ok to put it on my blog before the magazine is in the shops, and as long as I mentioned it would be published it's allowed :-)


I will enter the following challenges

http://www.simonsaysstampblog.com/mondaychallenge/challenge-a-cameo-appearance/   the hatter showing up in the steampunk world is my cameo http://alteredeclectics.blogspot.co.uk/2014/02/yayyy-2014-and-we-are-back.html

http://dianamlarson.blogspot.nl/2014/02/week-2-dlart-thankful-thursday.html http://rheddscreativespirit.blogspot.co.uk/2014/02/february-challenge.html http://vintageudfordring.blogspot.no/2014/02/utfordring-75.html


Monday, January 6, 2014

Pierrots canvas

I have been working on this canvas, I really like how it turned out, here some pics


I really love this Pierrots image,not a fan of clowns normally , but these are so much fun to colour. There are a lot more Pierrot image in Rick St. Dennis Zibbet shop.

The canvas is made in a simular way as the canvas in the Tuts and Comment tutorial here. Only different colours paint and Metallic Lustres used.


DecoArt products used:
Dazzling metallics paint color shimmering silver
Americana Weathered Wood crackle medium
Americana acrylic paint colour lamp black, lavender, bahama blue
Metallic Lustres : Iced Espresso and champagne ice
Texture Crackle  neutral


some closer looks at the crackle


Saturday, October 26, 2013

31 days of halloween day 26

Welcome to day 26 of the 31 days of Halloween organized by Smeared and Smudged,
blogroll is in the side bar.
I am also a Cryptkeeper in the Halloween countdown 2013, for the complete list of 192 Cryptkeepers joining the countdown to Halloween, see link here


yay 5 days to go, here's another canvas

All producsts used are Deco Art
First gessoed the canvas, then added a layer of Spiced Pumpkin Americana Acrylic paint. Used Weathered wood crackle medium and the top layer is Americana acrylic paint in lamp black .
The skull is made using a Panduro stencil and Deco Art modeling paste.
Then painted the modeling paste with Americana acrylic Purple Pizazz. And finished with Glamour dust glitter paint colour purple princess.
Added some rhinestones to give it what extra bling

 
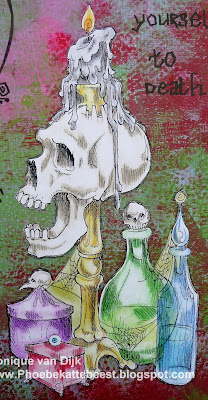
and another AJ page, using a Rick St. Dennis image called Cursed
Background a gelli pate print using Deco Arts  Americana Acrylic Paints (colours, true red, sour apple, carousel pink, hauser light green, tomato red, baby blue)


O and don't forget to go and visit our new Tutorial blog, you van find it here,
You will find all kinds of tutorials there from Mixed Media to colouring , there are all kinds of tips and tricks, gift ideas and a lot more , there are allready 28 posts there waiting for you, there will be more every week.
If you have requests for a tutorial, let me know and we will see if we can help out
 
 
see ya for day 27
 

Wednesday, October 23, 2013

31 days of Halloween day 23 and a GDT

Welcome to day 23of the 31 days of Halloween organized by Smeared and Smudged,
blogroll is in the side bar.
I am also a Cryptkeeper in the Halloween countdown 2013, for the complete list of 192 Cryptkeepers joining the countdown to Halloween, see link here


Rick St Dennis is sponsoring the challenge at THE CRAFTER'S CAFE CHALLENGE BLOG theme is  spookable, and I made this card for them as a GDT.

 
The witch is a Rick St. Dennis rubber stamp available at I Brake for Stamps, the background are Lost coast designers srtamps , the background is coloured using distress ink
 
As an extra project for today I have a cute little canvas.
 
 
All producsts used are Deco Art
First gessoed the canvas, then added a layer of Spiced Pumpkin Americana Acrylic paint. Used Weathered wood crackle medium and the top layer is Americana acrylic paint in lamp black .
The skull is made using a Panduro stencil and Deco Art modeling paste.
Then painted the modeling paste with Americana acrylic Purple Pizazz. And finished with Glamour dust glitter paint colour purple princess.
Added some rhinestones to give it what extra bling
 
see you for day 24