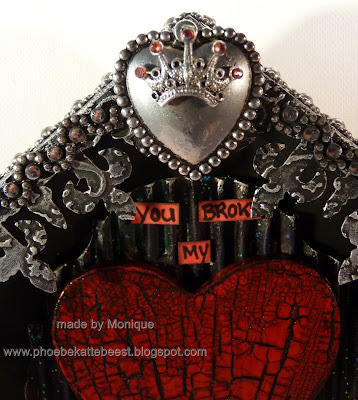
Deco Art products used: Metallic Lustres in Silver Spark, Black Shimer. Traditions paint in Raw Umber, Phtalo Green blue, Naphtol Red Light. Craft Twinkles in Christmas Red and crystal. Americana acrylics in Lamp Black. Matte Varnish and Gesso. Weathered Wood Crackle medium and Media Crackle Glaze. Antiquing cream in black
Other material used: cardboard (piece of a box) a wooden house shaped frame, a key , chipboard. Tim Holz dies, a crown charm a metal heart and a wooden heart. Rhinestones and ribbon. A Sharpie and Distress Ink in Barndoor Red.
You can find this shrine in my Zibbet shop here
First I die cutted the chipboard into the iron gate and the background for the heart from the cardboard box and gessoed everything.
Next I painted the wooden frame and heart lamp black, the Iron gate dies alse were painted black and embossed .the piece of cardboard was painted in Raw Umber, Phtalo Green blue and was given some sparkle using Craft Twinkles in Crystal.
I gave all metal pieces and the emobossed iron gate die cuts a vintage look using the Metallic Lustres.
Painted the word love on the key red and added Craft twinkles in christmas red. Put Rhinestones on the crown and the key.
The wooden heart got a layer of Weathered Wood over the black paint and the top layer is Naphtol Red Light. After the crackle appeared and the paint was dry I varnsihed the heart and let dry again. Next layere is Media Crackle Glaze and when that dried I rubbed some balck antiquing cream into the cracks and wiped away the acces. Used matte Varnish to finish the heart,
The senti came from the internet and was handwritten on a piece of cardstock using a Sharpie, added red using the distress ink and next step was glueing the all parts in and on the frame. I decorated the edges and sides of the shirne using a ribbon with metal decorations on it.
http://sandee-and-amelie.blogspot.co.at/2015/12/steampunk-winter-special-challenge-part.html
http://creativeartistemixedmedia.blogspot.co.uk/
http://mixedmediamc.blogspot.de/2015/12/mixed-media-monthly-challenge-19-silver.html
http://alteredeclectics.blogspot.co.uk/


