Followers

Showing posts with label progressive challenge. Show all posts

Tuesday, September 1, 2015

rsd progressive challenge boardbook part 3

the new challenge starts today at Sparkle and Glitter, anything goes as long as you use a digital Image by Rick St.dennis


I have made a page in my altered board book using Versailles and also check out Rick's new colouring book for adults here


 Deco Art products used:

Media Misters in Turquoise, White, Orange, Primary Yellow, Violet.  Americana multi surface Neons in Pink and Blue. Dazzling Metallics in Amethyst and Teal, Glamour Dust glitter paint in Turquoise and Purpl Passion. Americana Sweet Mint. Stencils by Andy Skinner: Incognito, Tornado and Serendipity.Glass paint marker in black


there is a video how I made it here

Monday, June 1, 2015

RSD progressive challenge part 2

Todau starts the new challenge at Sparkle and Glitter, part 2 of the Rick St.dennis Progressive challenge. The part 2 challenge always has a free image to be used. Everyone that has entered part 1 can get one, see for details the Sparkle and Glitter blog. If you did not play in part one you can buy it here


I used Mr Tea without the sentiment and made a Tea bag holder


DECO ART products used :  Decou Page Matte, Triple Thick Gloss Glaze, Glamour Dust glitter paint in Black Ice and Sizzling Red.
Deco art Media products: Crackle paste, Fluid acrylics in Cobalt Turquoise Hue and Raw Umber.
Americana Gesso, Traditions Acrylic in ultramarine blue.

The tea bag holder is a wooden do it yourself package, so I glued it together and gessoed it. Next was a layer of ulramarine blue to show up in the cracks. Next I addded crackle paste and when dry I used the Cobalt Turquoise Hue to paint it. When dry I added a glaze of Raw Umber Media Fluid to age it a bit.
I coloured Mr Tea using my Polychromos and cut him out. Decou pages him on the teapot and tried to get the cracks in the image (did not work out as planned). When the Decou Page was dry I added 2 more layers to seal it. Left it to dry and added the card symbols using glitter paint. Wrote a senti on the back of the teapot and finished the piece with 2 layers of Triple Thick Gloss Glaze for both protection and shine.


Hope to see you in the challenge

i will enter the following challenges

http://rheddscreativespirit.blogspot.co.uk/2015/06/our-june-challenge.html

http://notjustcardschallenges.blogspot.co.uk/2015/05/challenge-20.html

http://cagichallenge.blogspot.ca/2015/05/distress-it.html

http://thatcraftplaceblog.blogspot.co.uk/2015/05/new-challenge-shabby-chic.html

http://welove2create.blogspot.co.uk/2015/05/challenge-11-anything-creativemixed.html


Sunday, June 15, 2014

Rick St. dennis progressive challenge part 2 inspiration

see all about the chalenge on the Sparkle and Glitter blog 
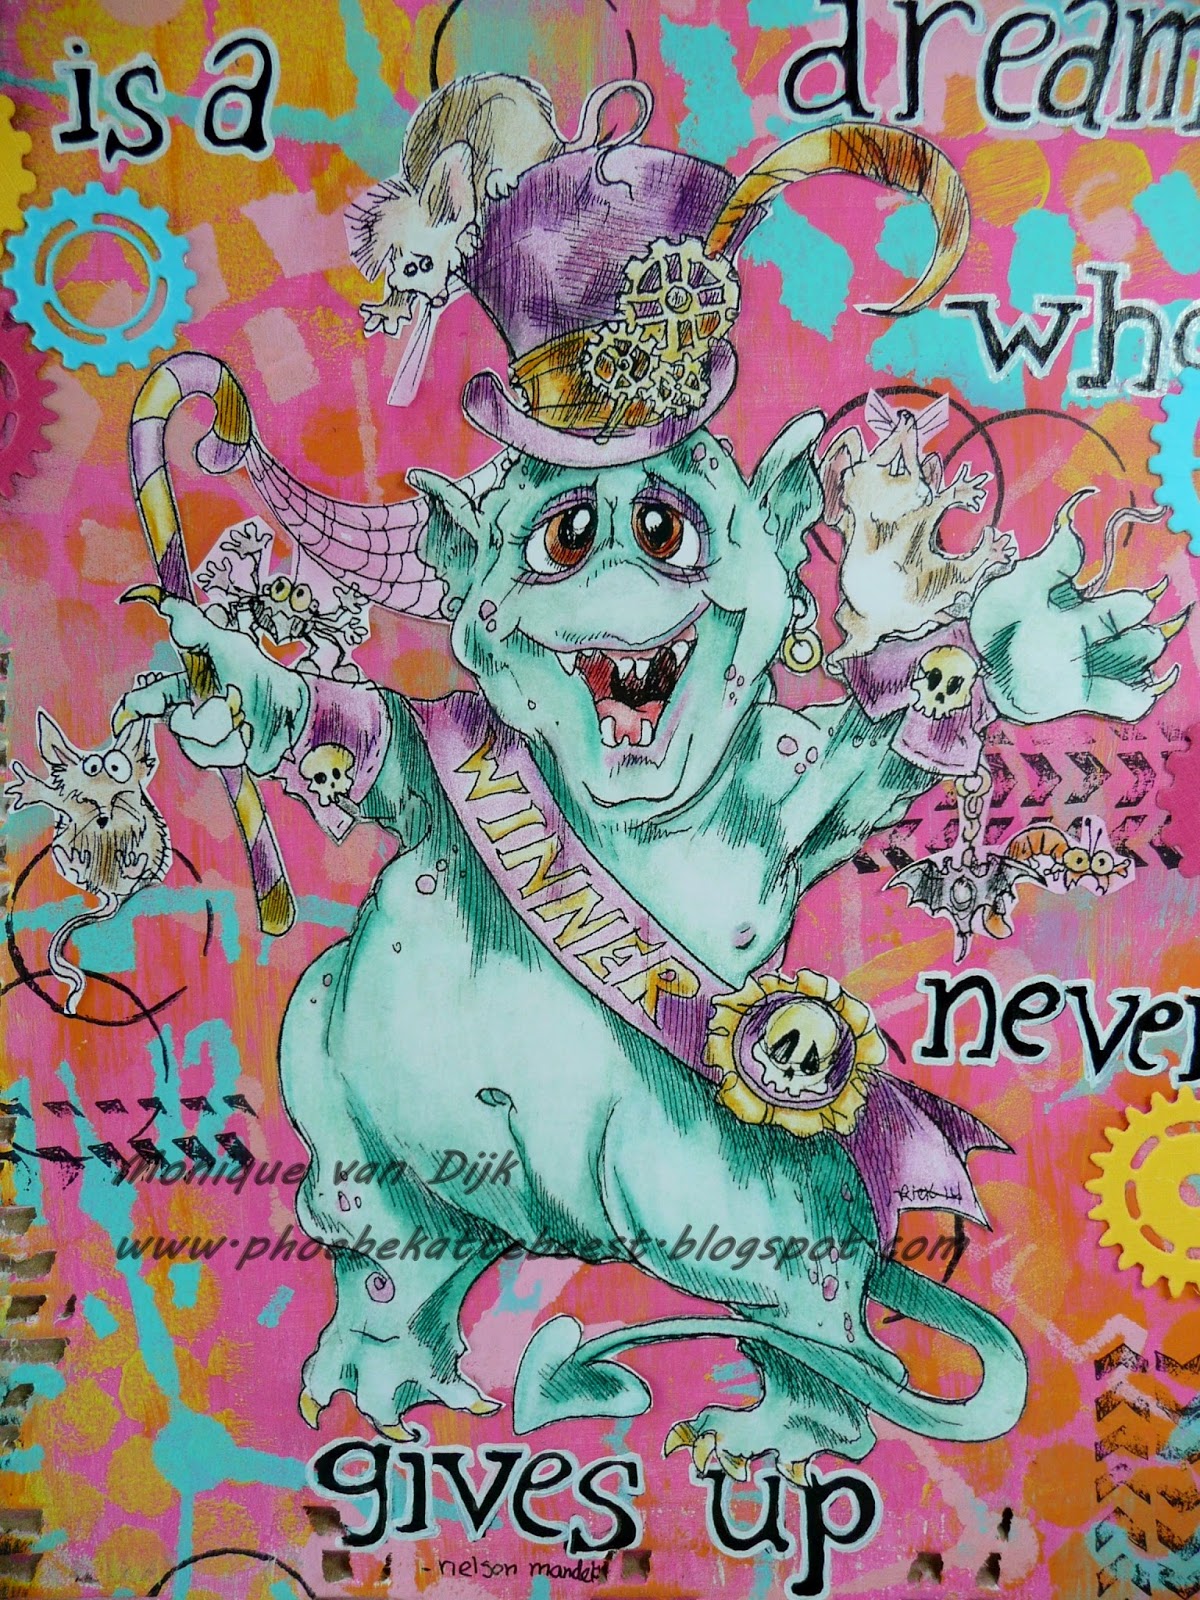
here, there is still time to enter, you can find the you're a winner Nyner the little monster here, you will need this guy to enter the challenge.

I used mine to have some fun with a piece of card board that came from a box, yep recycling here LOL

Well it's cheap and it's fun so why not use something you would throw away and alter it to something nice.

To do the trick I used Deco Art products (Gesso, and Americana Acrylics, coulours: Lamp black, Carousel Pink, Lemon Yellow, Bahama Blue and Tangerine and an Americana Mixed Media stencil called Timeless Treasures), also used some stamps and a gear die. and ofcourse Nyner, the Rick St.dennis digi


 It's super easy, take a box, cut one of the sides off , tear soem of the paper off, and Gesso, let dry.
Paint in your fav colour , I used the carousel pink, and use the stencil to get the clocks on, use different colours  and overlap some of the colours with another colour paint. I used a sponge for the stenceling.
You can always smudge some paints on the backgound using the sponges as well. Jut go all painty till you like the result.
Next step was the stamping, I used Archival Jet black and a circle  and arrow stamp. Colour the digi, cut it out and see where you want it to be on the cardboard. Add senti, in a way you still can read it after the image is glued on, that doesn't mean you have to avoid all letters, if you overlap the image most of the time the senti will still be readable, but it is something you want to think about when you start writing.
I found the senti on the net, it's by Nelson Mandela.  To finish abd for the extra steampuk feel I used cardstock in tuquoise , pink and yellow to die cut the gears.


hope you like, to see all other project by my fellow teamies , check here

Also there are challenges on facebook and Rick has hi own persononal red white and blue challenge.
check out sparkle and glitter for all info and links