Followers

Showing posts with label altered bottle. Show all posts

Monday, October 20, 2014

macabre monday at HDH and day 20 of the 31 days of Halloween on AC

A double purpose post today, sorry, life got in the way big time so I had to combine a bit, hope you don't mind.

So for the new challenge at Haunted Design House  and my turn on the 31 days posts on Airless Chambers.....

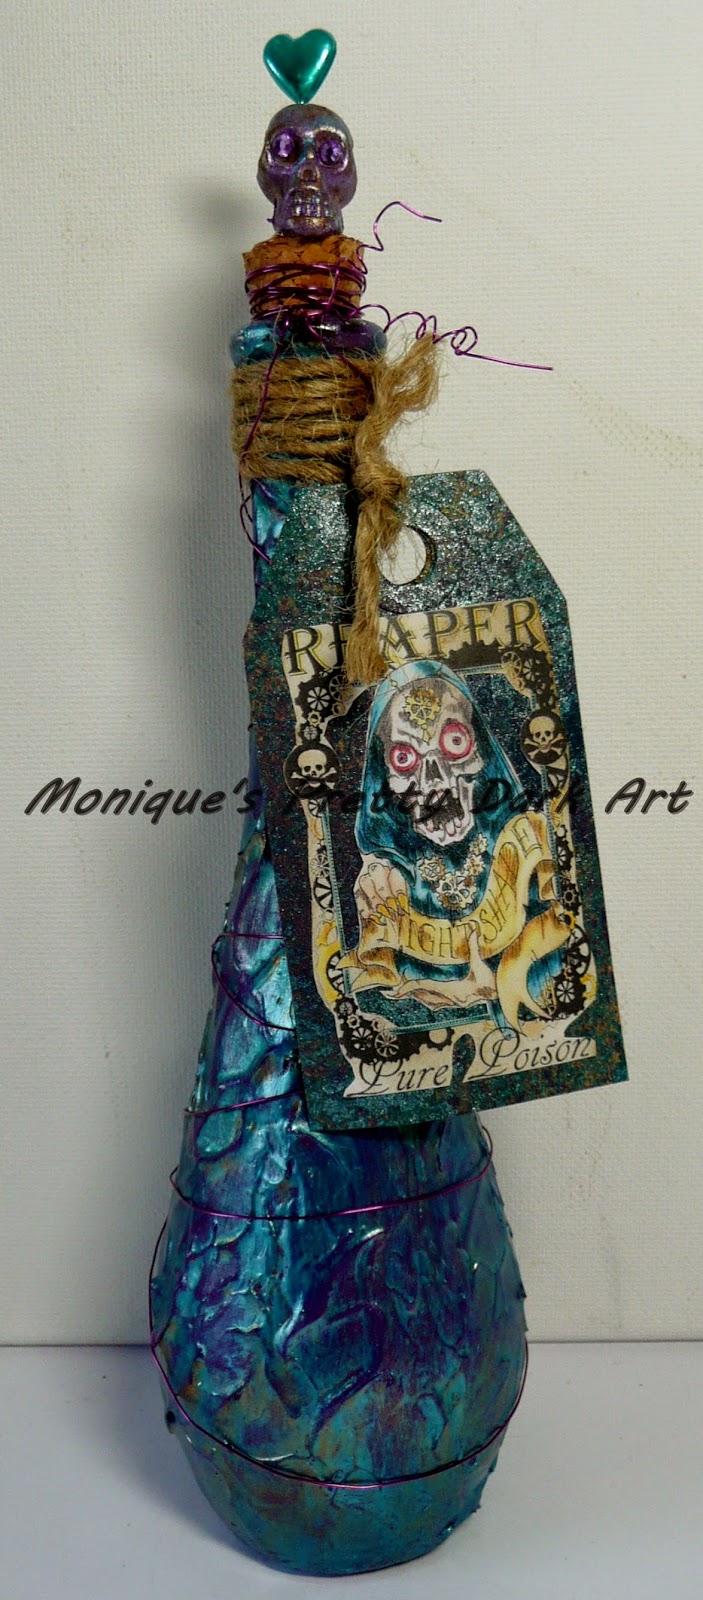
 I made a poison bottle for you, what's Halloween without poison?? Yah see, you absolutely need one......

so first a pic and than the receipe..

Ingredients:
A bottle (just a glass bottle any bottle will do)
Rick St. dennis digi called bottle lables (duh!!!) it's a set of 3 (1 bottle is never enough)

Deco Art products used
Dazzling Metallic paint in colour Teal
Elegant finish metallic paint in Medieval Gold
Metallic Lustres  in Brilliant Turquoise, Majestic Purple and Iced Espesso
Deco Art Media misters in purple and shimmer mister in turquoise
Wire, a plastic skull bead, a heart shaped hat pin, a kraft tag and some rope,  rhinestones


How to make a poison bottle for dummies:

1)  Remove cork (make sure it doesn't get lost) and clean the bottle (I use rubbing alcohol, don't drink the stuff, if you do you will not be able to complete this project).

2) Open the jar of Texture glass and stir, the stuff is white, but the cool thing is, it dries clear.

3) Use a palette knife to apply the texture glass on the bottle, dabb the palette knife on the covered bottle to get the texture, it's easy you can do it, you'll see.

4) Let dry (I just let it stay over night to make sure the thicker parts of the texture glass are dry too, and no,.... don't touch the stuff untill the next day, cuz you'll get finger prints in the texture. You DON'T want your finger prints on a poison bottle, savvy?)


While bottle is drying
Color the digi from the bottle lable set, I used Reaper Pure Poison (why go for less if you can have the pure stuff), 
Use the misters to give the tag a cool look :-) cut out the dig and glue it on the label

Add the metallic lustres (all 3 colors) on the plastic skull (rub with cloth to get more shine in between layers) 
Glue the rhinestones in the skull's eyes and let dry, done for today go do something else f.i. colour a digi, enter the DT call...whatever.....


next day :-)

5) Paint the bottle using the multisurface acrylic in eggplant, and let dry.

6) Paint a layer of Dazzling metallic paint in teal (shake bottle first, the paint bottle, not the one you are altering, well you can shake that too if you want, but it doesn't affect the end result, unless you drop it, in which case you clean up the shards (carefull sharp and you don;t want your DNA all over the place), find a new bottle and start over again), 
 Whipe off on randome spots till you get the result as in pic above. Let dry.

7) Shake the jar of elegant finish in medieval gold (open it)  and use a fan brush to apply a thin layer see pic.

Take a piece of rope and wrap it around the neck of the bottle, and attach the tag to the rope.
put the cork in the bottle 

Put the hat pin through the hole in the skull bead and press it into the cork (the hat pin not the skull)

Take the wire and wrap it around the cork and the bottle end next to the cork and make a nice curl in the wire.

Done, easy peasy, now for the poison.......there are several options, it just depends on what (who) you will be using it on, I suggest to google for the right receipe, it's out there somewhere, I'm sure

hope to see you all again tomorrow enjoy the hop


can;t wait to see your entries in the challenge at HDH

I will enter the following challenges


Tuesday, April 1, 2014

altered steampunk bottles


Hi all,

First some exciting news, the Rick St. Dennis Challenges will be back again starting May first, see all details, bout rules, freebies and prizes here. First theme is Steampunk so here some inspiration for you :-)

next exciting thing is,
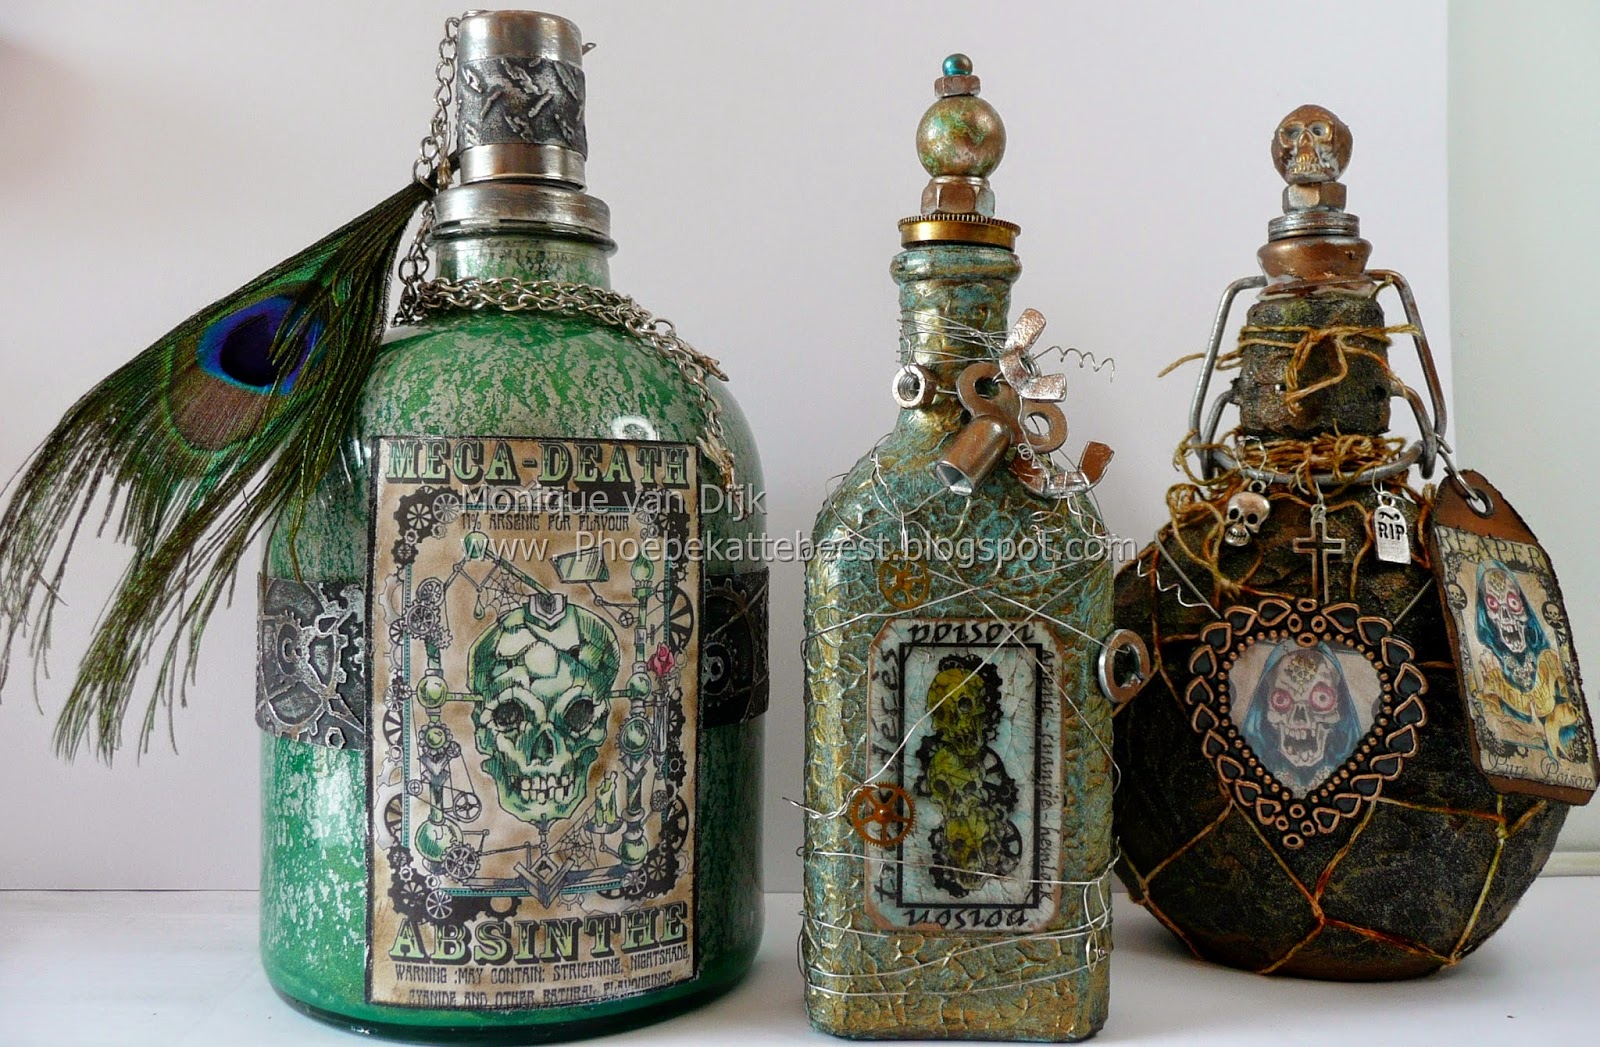
 I have been working on some altered bottles, Rick suggested I'd do some bottles, and drew me some labels to go with, and allthough bottles are fun to play with it is pretty hard to paint a them. I had some special texture DecoArt products in my stash some of them were specially made for use on glass. Problem was I had never used it before so I wasn't sure how tings would turn out.

Therefor I thought to work on 3 different bottles at the same time and see which one turned out best to submit to Just Steampunk Magazine vol. 5.

It took some drying time and sometimes I had to change plan a bit, but I really like them all, they are all different but I think they all look good so I submited them all to the magazine and they will all be published :-) in Volume 5 of Just Steampunk magazine, it will be in shops at Scott Publications in August.
 I will try to explain what I did in this post. First some pics


supply list:


DecoArt products used:
Americana Decoupage , Elegant Finish Metallics in : Reinassance Brown, Emperors Gold. Texture Fierro in Iron Black and Green Gold. Metallic Lustres in: Iced Espresso, Black Shimmer, Silver Spark. Dura Clear Matte Varnish, Americana Acrylics in Hauser Light Green, Traditiona burnt umber, Decoart Gloss Enamels in Indian Turquoise. Texture glass, Glazing medium.

Tim Holtz embossing folders : Diamond plate and Riveted metal, black cardstock, Silver Metallic spray paint,white glue, kinder toververf, brown cardstock, versamark embossing ink, clear embossing powder, plastic frame, decoration material from hardware store (wire, bolts, nuts etc), a piece of net. Peacock feather. Some broken jewelry and charms, plastic skull, beads, hat pin, glue, Distress ink: Walnt Stain, Broken china, Mustard seed. And the most important thing BOTTLES (any bottle you like will do, just clean them very well before you start)
 how to
I worked on all bottles at the same time because there is some drying time involved here and when one bottle is drying you can start with the next. I will explain bottle for bottle, otherwise things will be very confusing. So here is bottle 1

pic above is a before and after pic, just so you can see what I started with and how it turned out.

First remove any original lables on this bottle,  and clean it
Apply the Glas texture (use a palette knife andto create some texture), this will dry clear and can be painted using acrylic paint. I use gloss enamel Indian Turqoise because I don't have the colour in acrylic, but that would have worked too. when painted let dry and put a layer matte varnish on and let dry. Next add glazes using emprerors gold and the tratiotonal burnt umber (I colour at a time and let dry in between, you will have to wipe away some of the glaze to rubb it into the texture) When the glazs are dry add another layer of Matte Varnish on to protect the painting.


The stopper is the orignal cork decorated with some clock pieces and bolts, beads and a hat pin to keep them all together. 


The label, a Rick St.Dennis Digi is coloured using distress ink, (broken china and mustard seed) to age it use versamark embossing ink and clear embossing powder. Use at least 3 layers of embossing powder (melt in between each layer) and put it in the freeze for 10 minutes, get it out and break the embossing powder, use dome distress ink to rubb into the cracks.

Use foam tape to add it to the bottle, decorate using wire, clock parts and bolts ( age all decorations with metallic lusters)


Bottle 2   (see pic below for before and after)

Remove the cork complete with the iron piece that closes it, remove labels and cover the bottle with a layer of decoupage and let dry.
add the Texture Fierro (black first) using a palette knife (make sure the holes where the iron piece goes stay open) let dry.


Use an old paint brush to dabb some of the green gold Texture Fierro on, let dry and use Reinassance Brown  Elegant finishes to age the bottle, just dabb some on random spots very carefully. When dry use the net to wrap the bottle (attache it to the bottle neck and tie it on the back of the bottle) Decorate using the charms. Put the cork back on the bottle  with the iron part, Age the cork using Metallic lustress and add some bolts ad the skull (also lustre those )


The label is a Rick St. Dennis digi, coloured using pencils,  cut a label using the brown cardstock, add the coloured digi and use some walnut stain to age the label, attache it to the iron part of the cork.
Cut out another coloured RSD digi label and make sure it fits the frame, use some distress to age that image aswell befor you put it in the frame. Attache the frame to the bottle using a chain.


Bottle 3

ok this isn't a real bottle it's an oil lamp LOL see pic below
but now it is an Absinthe bottle 
Remove the cap and the fuse, the iron ring can't be removed but the part that held the fuse can be screwed off (to till with lampoil, but I used paint LOL)

This is the hardest one to paint cause it's painted from the inside and that is har to control.

Start with a mix of white glue and water (50/50) and add Hauser Light Green for colour, poor this in the bottle and twirl till the paint is all over the inside of the bottle (the paint will drop to the bottom of the bottle after a while when you put it aside, just repeat the twirling part till you like the result, poor the rest of the mix out of the bottle and let dry.
Next layer is the silver metallic spray paint (spray  the paint in a plastic cup and poor it in the bottle and twirl again, this will stick much easier than the first layer) Last layer is the green paint it's a waterbased paint for kids, called magic paint, it takes a while to dry and it has some gold shimmer in it, poor in the botte and cover the whole inside till you bottle look like mine. Let dry.


color  the Rick St. Dennis label and mat it to black cardstock, cut a black cardstock strip to go around the bottle (emboss first, and use metallic lustres to give it a metal look) add it to the bottle and then add the label


see the back of the bottle

add an embossed piece of cardstock to the cap aswell (metallic lustre for metal look) and decorate the bottle using a chain and some charms (I use fairies cuz Absinth is also known as the Green Fairy)

that's it if you have questions please let me know


I will enter the bottles in the following challenges;
http://leftofcenterchallenges.blogspot.co.uk/2014/03/challenge-28-ribbon-andor-flowers-with.html
http://sandee-and-amelie.blogspot.co.at/2014/04/your-favourite-technique-goes-steampunk.html my fav technique is painting bottles
http://www.throughthepurplehazechallenges.blogspot.co.uk/2014/03/steampunk-35.html
http://rheddscreativespirit.blogspot.co.uk/2014/04/april-challenge.html

Friday, October 4, 2013

31 days of halloween day 4

This is day 4 of 31 days of Halloween (for details click linkie)  organized by Smeared and Smudged. Blogroll in the sidebar

And I am also a Cryptkeeper in the countdown to Halloween, see the list of the other 192 participants here

Today is Smeared Ink day and that will give you an extra chance to win the prize if you use a Smeared Ink stamp on your project.

here is my day 4 project a poison bottle

lots of pics comming

the bottle was brown glass, and I wanted to age it a bit
 
mix it, poor in the bottle and twirl it till the whole bottle is covered on the inside, this needs time to dry and you will have to turn the bottle a few times to keep the paint where you want it (gravity sucks, makes paint drip down)
I had prepared this part, the rest I did today and that was challenging.
Paint and glue needed drying time and needed to take pics in daylight
 
The skull is a Rick St. Dennis image boneyard Skull
 

The label is a Tim Holtz embossing folder. The paper  used is black cardstock, hard to believe when you see it now hey??
 
the magic ingrediënts are the Metallic Lustres, i used Gold Rush, Copper Kettle,  and Black Shimmer.
It's real easy to work with. I used a make up sponge and started to add the copper kettle first. It will get more shine if you use a cloth to rub it. then added the Gold Rush and Black Shimmer, just random till I liked the result.

 
Yes that is a doll head I used as a stopper.  I be headed a little baby doll, and poked some holes in the head for the horns . The horns are Lego (from a viking helmet, ssshhh don't tell my son)
the head the horns and the cork are painted with a layers of Deco Art Dazzling Metallics colour copper and added some Americana Antique teal .

the heart was lustred and the skull painted same as doll head

the Plague is a smeared ink digi, coloured using distress ink (rusty hinge, walnut stain and peacock)


This skull is a Rick St. Dennis image boneyard Skull coloured with distress ink


that's all folks, see you tomorrow for day 5
 
 
I will enter this bottle in the following challenges


Wednesday, March 27, 2013

SNS Throwdown challenge #2 Faux Finish and Rock n Rolla challenge

Ok here we go, probably a long post with lots a pics so i will start with getting the linking buisines out of the way.The TrowDown is an Smeared and smudged event, see rules here. The challenge theme is made up by last challenge winners HDH, big congrats to you all and  you'v come up with a great theme I love everything Faux.

The Rick St. Dennis team are again Miranda, me and of course Rick, the post is linked from his blog you can find all the teams projects (and the digi sets) there.

I used Rick St. Dennis digi's check out his blog the set is only available there.
 The Bone bunny is from Smeared Ink (I cut of his ears btw, but made sure it was dead first)

Rock n rolla challenge post is at the end of this one

Now we can start with the fun part, PICS,  I made a poison bottle and a tag will tell you below the pics how i did it

This was a glass bottle, there used to be olive oil in it
first I embossed cardstock and glued it on the sides of the bottle
then covered with aluminum tape, and made sure the embossed pattern showed, very carefully to not tear up the tape.
Covered the tape with black arcrilyc paint, let dry for a bit and wipe off again.
Next layer paint is bronze acrilyc paint, let dry and wipe till you got the look you want.
Now it looked rusty, which was cool but i wanted a more copper look, so added some spots of blue and green acrilyc paint, which could stay on there for a change.
Now that was the messy part. Could start decorating now
This side of the bottle has beads on it spelling the word "poison" the are coverd with alohol ink and attached with a leather shoe lace.
The Skull and bones, and roses are Rick St. Dennis digi's, the skull is layered to make a 3d  faux porcelain look. (6 layers of skull covered with crackle glossy accents and distress ink walnut stain)


Every poison bottle needs a spoon, how else would you know the right amount to take LOL, this was a stainless steel spoon, but it needed to be old (does faux old count lol) so used acohol ink (caramel and green) and sealed with glossy accents. Added ribbon, silk flowers and a faux Ruby (just a plastic bead but hey, you wanted faux stuff). The skully was a necklace and undereath are beads.
The other side of the bottle has an embossed skellie and a framed Smeared Ink digi, wanted to make it look like an old photograph ( is that also Faux?)
The pentagram (which is of course up side down) I made out of wire, bit of a puzzle but it came out ok

the last side has a dragon on it (this was also a necklace) used alcohol ink on it and attached with a chain, the bottle has glitter glue in it but is supposed to be faux blood (faux dragon blood if you want)

some close ups


The stopper isn't a stopper (hey faux again) it's a lightbulb, painted in same colours as the bottle and sealed with glossy accents. The decoration on the stopper are 2 buttons glued together and a plastic skull which i also painted in the bottle colours.
Final touch, a leather shoe lace and another skull charm (with faux diamonds, it's glass sssshhh don't tell)
Kind a cool you can make this using all kinds of stuff that was allready in my stash, never throw away anything cause you don't know when you will need it, LOL

Now the other project is a tag


Same procedure but hand embossed the dots using ruler and embossing pen, did the paint thing again (rusty look this time) and made the embellishment from charms and bat wings stamps (used copper embossing powder on them and the wings are also faux metal)
The Rick St. Dennis skull and bones is available on Rick's blog and the Dead Dancer Falling is a Smeared Ink digi, she is attached to the skull with strings.
The senti on the skulled heart says : dance with death.

that's it, don't forget to check out my teamies projects and to vote.
================================================================
 
 
this is a tag I made for the Smeared Ink Rock n Rolla challenge,
the skull and hand digi are Rick St. Dennis images and the dead dancer pointing is a Smeared Ink digi, the rubber in the background is from the stempelwinkel
 
the dead dancer is attached with strings again to the hand


I will enter this tag in the following challenges