Followers

Showing posts with label DecoArt. Show all posts

Thursday, September 21, 2017


On the Sin City Inpsiration blog I will show you how to make this card, using the masking technique. See step by sep instructions here


Supply list:
Sin City Stamp sheets:

White Cardstock
Black cardbase
Black waterproof stampink
Ink pads in several colors
Masking paper
Scissors

Sunday, September 17, 2017

USA flag AJ page

I was playing around with a Deco Art Stencil and this came out


Deco Art Products used:
Deco Art Americana acrylics in : True Red , Snow White, True Blue and Navy Blue
Deco Art Americana Gesso, Stencil American Tribute


I made this in my small Moleskine journal, it has very thin paper so first I glued 2 pages together and next added a layer of gesso.

The Flag of the stencil was exact the right size to fit on the spread and I started stenciling the red using a stencil brush.
Next I adde the blue and made the background around the flag blue too.
The stars are in the stencil and I used white for them, next I painted the white stripes.

The shades were made using a Faber Castel pitt brush pen in black.


Saturday, July 1, 2017

S.I. Reunion

Hi all welcome to my bloggie for my part in the Smeared Ink Reunion bloghop, you can find the blogroll at the bottom of this post.


I love making scenes using rubberstamps and for this card I used 2 Smeared Ink sets (Haunting places 1  and 2 by Rick St.dennis) and mixed them with 2 stamps from Sin city sets (the skull and bones are from the Dribones set by Rick St.dennis, now for a special prize of 14.95 USD for limited time,  the Moon is from the Sunshine Cherub set) and the bats from de Stempelwinkel.

I wish the moon was a little more creepy but I still like how it turned out, what do you think?

 Isn't it great to see how well all those different stamps work together.
 The background is distress ink and the stamps are colored using Faber Castell polychromos pencils
 Here a closer look, this did not take much masking, so it was pretty easy to do, maybe I should do a video on how I make these scenes.
The embossed edges on the card got some Deco Art metallic lustre in burnished brass to get some shine. I jut like the effect the metallic lusstres have.


For the ones that have not been around my bloggie for a while, check out my right sidebar, you will find a link to the stamp set I designed for Sin City and a link to my You Tube channel (would very much appreciate if you subscribed there )

Have fun hopping and hope to see you again on my blog

Blog roll

Val
Ike


Thursday, December 24, 2015

hearts

I have been working on some small canvas mixed media projects to put in my Zibbet here , they are fun littleprojects, canvas size is 4 x 4 inch


DECO ART products used:  Andy Skinner Stencil Shedded, Americana Gesso, Matte Varnish. Americana acrylic in Moon Yellow, Media Fluid Acrylics in Primary Magenta, Cadmium Orange Hue, Cobalt Teal Hue, Yellow Green Light. Media Matte Medium, Triple Thick Gloss Glaze, Texture Crackle in Deep Tuscan Red, Media Crackle Glaze, Traditions paint in Carbon black, Red Violet. Media Antiquing Cream in Patina Green and Titanium White, glamour Dust Glitter paint in Ice black.  

Other products used, stamps, Dymo lable maker, tissuepaper,poece of an old dictionary, white gel pen,Tim Holtz die  and distress ink. Honey comb stencil


HOW TO:  first gesso the canvasses. Next takce 2 pieces of tissue paper big enough to cover the canvas (also on the sides) and use stamps to create a background


For the Follow your heart canvas the tissue paper was glued on the canvas using matte medium. just cover the canvas in the matte medium and put the tissue paper on, than use a paint brush with matte medium to go over the tissue paper to seal it, Start in the middle and work to the edges to get rid of airbubles, When the tissue paprer creases that is not a problem, texture is good :-)

Let dry and paint over the tissue paper using media fluid acrylics in Cobalt Teal Hue and  Yellow green light. Let dry. Die cut the heart ( Use cardboard from an old box,save the heart for the other canvas) and use the pice of cardboard where the heart came from as a stencil to make the heart, using a palette knife ad the Texture Crackle. Let dry and add antiquing cream in patina green and rubb it in the cracks.  Remove access using a baby wipe and use a layer of Triple thick gloss glaze to protect the antiquing cream.  Next stamp the circles using Gesso (my circles are a stamp by Joy Designs, but a cap from a bottle will work too.
Use the Dymo to make the text and add that to cardstock, cut to size and adde some red from Tim Holz disstress ink to the cardstock, next add tripple thick gloss glaze and when dry place it on the canvas.


The Cherish canvas,  paint the heart Primary Magenta, and when dry stamp on the heart and varnish.
The canvas has a base coat of Mooon Yellow next glue on the tissue paper( I used some argyle stamp and the word LOVE and some random letter stamps to create the background) use matte medium like on the other canvas. When dry paint the tissue paper on the canvas in Cadmium Ornage Hue media fluid and in Traditions Red Violet. Use a bit black to age.
Stencil the honeycomb stencil with red paint and the Andy Skinner stencil in red.
Add the crackle glaze to the heart and use white antiquing cream to make the cracks stand out. Draw the arrow using a white gel pen and use Triple thick gloss glaze as a varnish. Glue the piece of the dictionary on the canvas with matte medium(first use distress ink to colour it matching to the canvas). When the canvas is dry glue the haert on. Stamp the word cherish on a piece of cardstock, use distress to colour it and triple thick gloss glaze . Glue it on the heart and the canvas is done.

Tuesday, September 1, 2015

rsd progressive challenge boardbook part 3

the new challenge starts today at Sparkle and Glitter, anything goes as long as you use a digital Image by Rick St.dennis


I have made a page in my altered board book using Versailles and also check out Rick's new colouring book for adults here


 Deco Art products used:

Media Misters in Turquoise, White, Orange, Primary Yellow, Violet.  Americana multi surface Neons in Pink and Blue. Dazzling Metallics in Amethyst and Teal, Glamour Dust glitter paint in Turquoise and Purpl Passion. Americana Sweet Mint. Stencils by Andy Skinner: Incognito, Tornado and Serendipity.Glass paint marker in black


there is a video how I made it here

Friday, July 17, 2015

altered palette #3

The last one in the alterd palette series (well for now anyway...), a steampunk one, just like the other 2 I made this for friends as a little present.


Deco Art products used: Glamour Dust glitter paint in Ice Crystal. Americana matte varnish, Americana Acrylic Gesso, Traditions acrylics in the colours; Raw Umber, Pthalo green blue, Hansa yellow, Opaque white, ultramarine blue, Carbon black, Red Violet. Media fluid acrylics in Burnt umber, transparent red iron oxide, Metallic Lusttre in Copper kettle, Iced espresso, Black Shimmer
I used rubber stamps from the Stempelwinkel, Kicostamps and some clear stamps. A wooden paint palette, and some cheap paintbrushes. The dies are all Alterations by Sizzix


Start with a layer of gesso, it will make a better surface to paint on and it makes the palette white, so the colours of the paint will show up better. Paint the palette Ultramarine blue and let dry, I stamped the gears and painted the galaxy layer using sponges and a toothbrush. I have made a video about that here, I just ued diffferent colours this time. Next is the stamping, Varnish and add the glitter and age the edges using a paint brush and paint some damaged spots to the edges. Make a wash using the media fluid in burned umber mixed with water and add that over the palette. When done varnish to protect. Give the paint brushes the same treatment. The Die cuts are painted black and given some metallic lustres layers.


I will enter the following challenges

http://rheddscreativespirit.blogspot.co.uk/2015/07/julys-challenge.html

http://alteredeclectics.blogspot.co.uk/2015/07/july-is-it-really-where-is-time-going-to.html

Monday, June 30, 2014

Travel Journal

Hi All


Some of you allready know, we will be traveling to the USA 12 th of july and have the biggest vacation ever :-)

I am looking forward to this adventure very much. This is probably the last vacation togehter with the kids and it will be the longest time away from home for us ever.  Because I usually take some crafty things with me on vacations I thought to document our trip in a Travel Journal. This will be my fist travel journal so no idea how this will turn out, or if I can keep up with writing in it.

Well I am prepared now, the journal is ready to go (well at least the cover is, the inside is still blank)

I used DecoArt Americana Acrylics to paint the cover of the book (it's a dummy book) the colours I used are Red Alert, Snow White, Lamp Black, True Blue. The red letter are written using a Deco Art Glass Paint marker (yes they are supposed to be used on glass, but I found they can write over acrylic paint too, not a lot markers can do that) I protected the cover with two layers of Dura Clear Matte Varnish.


I made the stripes using masking tape, the stars are a foam stamp, and the statue of liberty is a stencil (had that for ages, it's no longer available, think it's from Avec)


some closer looks, the front:
 the front, spine and the back :-)
 the back

I will enter the following challenges

http://www.4craftychicks.blogspot.nl/2014/06/4-cc-200-stripes.html

http://redcarpetstudiochallenge.blogspot.nl/2014/06/rcs-73-born-on-fourth-of-july.html

http://open-mindedcraftingfun.blogspot.ca/2014/06/challenge-13-patriotic-colors.html

Sunday, June 15, 2014

Rick St. dennis progressive challenge part 2 inspiration

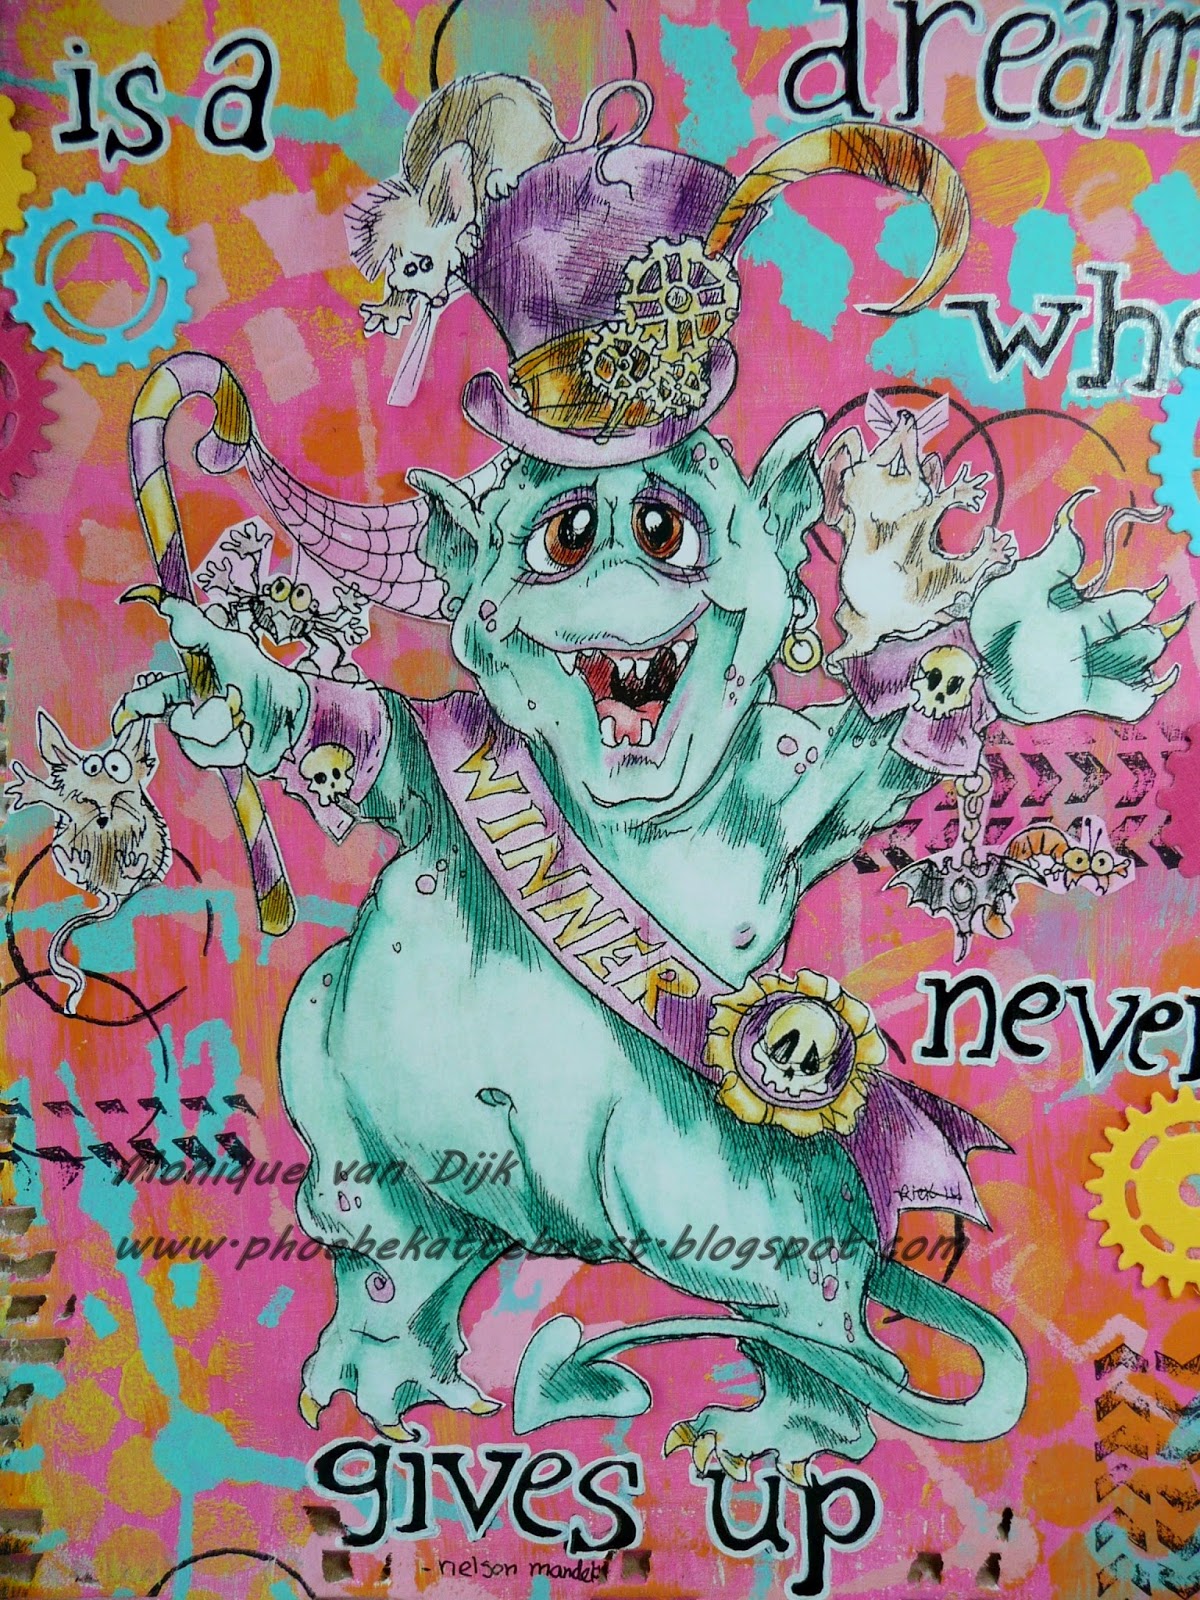
see all about the chalenge on the Sparkle and Glitter blog here, there is still time to enter, you can find the you're a winner Nyner the little monster here, you will need this guy to enter the challenge.

I used mine to have some fun with a piece of card board that came from a box, yep recycling here LOL

Well it's cheap and it's fun so why not use something you would throw away and alter it to something nice.

To do the trick I used Deco Art products (Gesso, and Americana Acrylics, coulours: Lamp black, Carousel Pink, Lemon Yellow, Bahama Blue and Tangerine and an Americana Mixed Media stencil called Timeless Treasures), also used some stamps and a gear die. and ofcourse Nyner, the Rick St.dennis digi


 It's super easy, take a box, cut one of the sides off , tear soem of the paper off, and Gesso, let dry.
Paint in your fav colour , I used the carousel pink, and use the stencil to get the clocks on, use different colours  and overlap some of the colours with another colour paint. I used a sponge for the stenceling.
You can always smudge some paints on the backgound using the sponges as well. Jut go all painty till you like the result.
Next step was the stamping, I used Archival Jet black and a circle  and arrow stamp. Colour the digi, cut it out and see where you want it to be on the cardboard. Add senti, in a way you still can read it after the image is glued on, that doesn't mean you have to avoid all letters, if you overlap the image most of the time the senti will still be readable, but it is something you want to think about when you start writing.
I found the senti on the net, it's by Nelson Mandela.  To finish abd for the extra steampuk feel I used cardstock in tuquoise , pink and yellow to die cut the gears.


hope you like, to see all other project by my fellow teamies , check here

Also there are challenges on facebook and Rick has hi own persononal red white and blue challenge.
check out sparkle and glitter for all info and links

Monday, May 19, 2014

Macabre Monday # 189 Ripped to Ribbons


Yep it;s that time again, a new challenge at Haunted Design House, theme this fortnight is Ripped to Ribbons........now that's easy......Just use some scary stuff and add ribbons, anyone can do that, see my project, super easy LOL

I made a Triptych (thanks Donna for giving me the English word).

It's made out of the cardboard back of a drawing pad (I always recycle those), ths side panels are made using the Tim Holz Sizzix die Vintage Cabinet ( I never thought I would use it that much, but can;t live without it anymore I guess). The Panel in the middle is just hand cut, I used a tag shape.

This was supposed to be just a tag, the side panels sorta happened ( yup. I know I should think before I start, but usually my projects turn out to be a lot different than what I thought they would be)


 So this is what I started with, just plain cardboard, covered with white cardstock. Stamps used are a dancing skellie and tombstones form de Stempelwinkel, and a shrine stamp from Lost Coast Designs. The skellie was stamped first, masked and than the Shrine was stamped. Masked the Shrine and the skellie and stamped the tombstones. I alsway love to create these kind of scenes using lots of stamps.

after the stamping was done, they were coloured using pencils.

I just thought to add a ribbon in a hole at the top and be finished, but it just didn't look very good, so I made the side panels

the Stamps used are all Lost Cost Designs, there is a Sugar Skull, the crackle back ground stamp and the domino and skull border stamps (first stamp the skull, mask it and tamp the rest also using masks)
Coloured the skulls using pencil and the background is Distress Ink (Mustard seed, Tattered glass, and walnut stain)


 I made holes on the sides of the panels using a crop a dile, this way  the panels could have hinges made out of ribbon (I had to put ribbon somewhere) .
And as a finishing touch I used DecoArt  Texture Fierro in Iron Black  to give the edges a bit of a distressed/vintage look and added some DecoArt Metallic Lustre Iced Espresso, to give it some extra shine (it doesn't show very well in the pic, but looks great IRL)

Can't wait to see what you all will be making for this challenge, will see you there


Monday, April 21, 2014

Macabre Monday # 187 Working in the lab, late one night....


Time for another challenge at Haunted Design House, this fortnight the theme is:

 WORKING IN THE LAB, LATE ONE NIGHT - mad scientist, rats, beekers, experiments gone wrong

:-) experiments gone wrong is my specialty LOL, you guys will never know how many of my experiments go wrong :-) (sssshhhh don't tell anyone)


To play safe this time I thought to keep it simple, hope you like


I guess the senti is true, LOL  I found it on the internet. I don't kow what the scientist was aiming for, but I think it's not what he expected it to be. On the other side two heads are handy I guess, always someone to talk to and twice the amount of voices in the heads.........watch the teeth though

 Background is a gelli print using DecoArts Americana acrylics  (Bright yellow, Spiced pumpkin, Dragon fruit)

The Gemini digi is from Declicious Doodles (it's part of the horrorscoop series, my son is Gemini and this is finally a Zodiac sign he likes ).

The Mad Scientist is a Smeared Ink digi, he is sooooo funny. both digis are coloured using Derwent coloursoft pencils.


Also check out my fellow Minions project on their blogs and on the hdh blog, hope to see you in the challenge

I will enter the following challenges
http://leftofcenterchallenges.blogspot.nl/2014/04/challenge-29-anything-goes-dark-themed.html

Monday, April 7, 2014

Macabre Monday # 186 Steampunk Junk

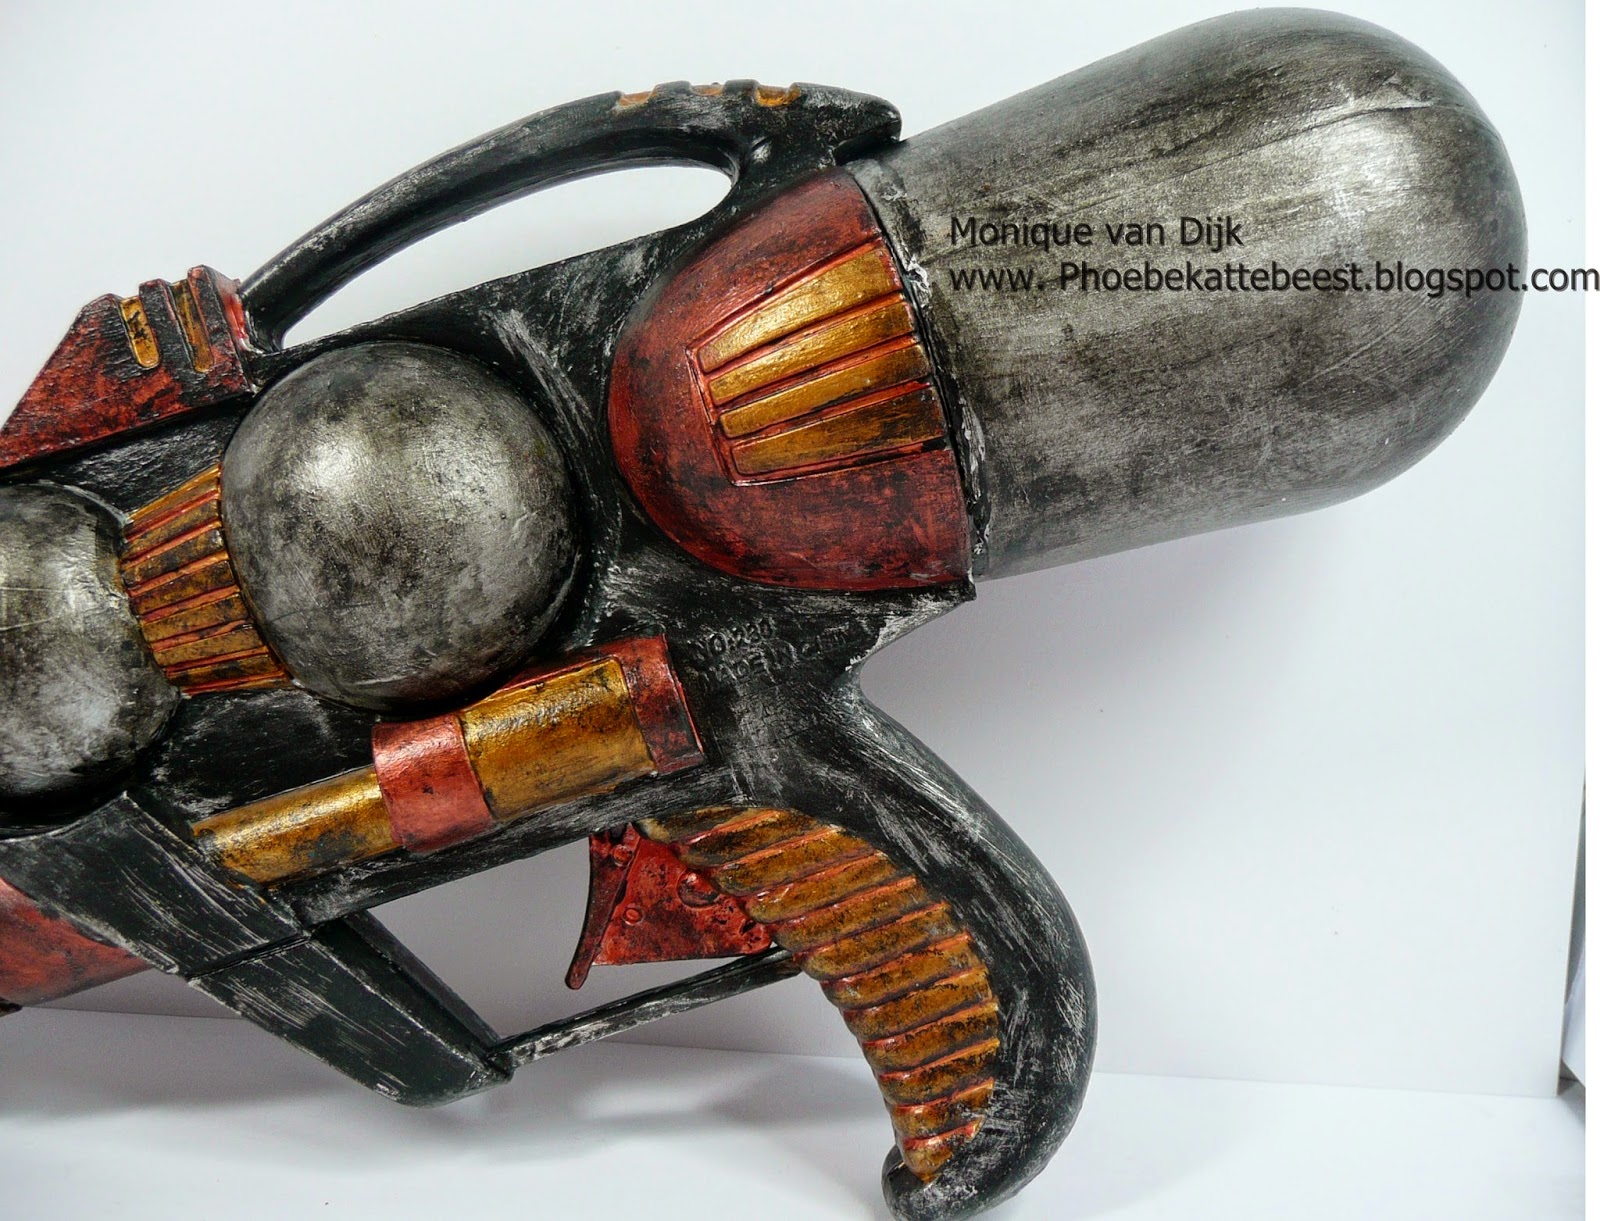
The new challenge at Haunted Design House is all about Steampunk Junk, so another steampunk project for me. The junk part is a water gun, cuz Steampunkify a gun was on my "To Try List"for ages. I really wanted to use a Nerf gun, but my son wouldn't let me.......after seeing what I made of the water gun, he chamged his mind LOL. So maybe someday .....

here the finished water gun


DecoArt products used:
 Acrylic Gesso and Primer Sealer
Dazzling Metalics: Copper, Shimmering Silver, Venetian Gold
Americana Acrylic Lamp Black
Duraclear matte varnish

you also need a silver metallic spray paint, sanding paper and of course a toy gun


first sand the gun and clean it, add the Primer Sealer, let dry and Gesso the gun,


use the metallic silver spray paint (outside, I put the gun in a box first so there wouldn't be any paint on places you don't want the paint to be LOL). Spray several layers but let dry in between.

when dry, use the Dazzling in copper and venetion gold to paint some of the parts of the gun, see pic above

When dry use the Americana Acrylic lamp black to paint the rest of the gun, leaving the watertanks silver.

Let dry again. Next step is to age the gun I used lamp black on the silver parts and shimmering silver on the black parts. Add paint and let dry a bit and wipe away using a baby towel and kitchen towel. You just have to experiment a bit to see what works best. Dabbing with the kitchentowel after using a baby whipe worked best for me


Hope it looks like a Steampunk Gun now,  anyway, my follow Minions have some awesome steampunk stuff for you, go check out their bloggies.  Can't wait to see what you all make to enter the challenge

I will enter this in the following challenges:
http://rheddscreativespirit.blogspot.co.uk/2014/04/april-challenge.html

Sunday, March 30, 2014

Amulet and Brigitte


I've got 2 things to show you, an Art Journal page and a card.

The devil image is a Rick St.dennis digi called Amulet and he can be found here, the background is a Gelli plate using Americana Acrylic paints by DecoArt ( colours used: Tomato red, Ocean Blue and Snow white)


The quote is from a song called "thanks for the memories"by the Fall Out Boys (I changed it a little bit to fit the page), I got the idea while I did my run, this was one of the sons on my running app. When I heard that part of the lyrics it made me think of Amulet LOL
Amulet was coloured using pencils

I will enter this in the following challenges:
http://leftofcenterchallenges.blogspot.nl/p/loc-1st-anniversary-challenge-starting.html

http://leftofcenterchallenges.blogspot.co.uk/2014/03/challenge-28-ribbon-andor-flowers-with.html

http://sugarcreekhollow.blogspot.nl/2014/03/83-make-your-own-background.html


next is the card

I used a rubber stamp called Brigitte from I Brake for Stamps, it's one of the Randi Dandi images by Rick St.dennis.  It's just a simple card, hope you like it anyway

The image was stamped using Archival Jet Black ink and coloured using pencils.

I will enter this card in the following challenges
http://www.dreamweaverstencils.blogspot.nl/2014/03/march-madness-week-4thinking-outside-box.html

Wednesday, March 26, 2014

Left of the Center Challenge blog anniversary day 20

Left of the Center is one of the blogs I play if I have the chance, the challenges are always non cute, so I guess that's why I like to go and play there LOL. This month LOC has an anniversary challenge, it lasts whole month and there a great prizes to be won and lots of inspiration to be seen, so go check it out.

Maureen, (usually Mo, but a bit confusing, so we talk to each other as "the other Mo" which I guess doesn't make things easier) asked me if I wanted to do a GDT project for the first anniversary, sure, why not....so here it is,.... my offering for the LOC anniversary is an Art Journal page using the Rick St.dennis MFA Vampyr Masquerade digi


 the background used is a gelli print as base and added some stenceling, the stars, and the funny looking plant, and the circles on the edges. Paints used are all DecoArt Americana Acrylics, colours used: Red alert, Spiced Pumpkin, Winter Blue, Purple Pizzazz, Carousel Pink, Sour Apple, Moon Yellow.
The Vampyr Masquerade image is coloured using Derwent Coloursoft pencils, the senti says: "I love the night, it's the only time I feel really alive.

Thanks Mo for asking me and a happy anniversary to LOC


I will enter this in the following challenges':

http://leftofcenterchallenges.blogspot.nl/p/loc-1st-anniversary-challenge-starting.html

Monday, March 24, 2014

Macabre Monday # 184 Skullduggery

Our new Macabre Monday theme for the next two weeks:

SKULLDUGGERY

The word 'skulduggery' is a noun,
meaning underhanded or unscrupulous behavior; trickery.
Notice how we purposely misspelled it with two "l"s?
We're looking for SKULLS, but if you can manage to work
both the definition, and the skulls in,
then you have a win, win project on your hands! 

So, just to be clear, we want to see skulls. Lots, and lots of skulls


Also a new Minion in the Dungeon, Fiona Randall, go check out her awesome work

sooooo skulls it is, I made a skull shrine


Deco Art products used:
Dazzling Metalics Venetian Gold
American Acrylics, colours: Mocha, Sable Brown, Sand, Lamp black, Traditional Burnt Sienna
Americana GessoWeathered Wood Crackle MediumDura Clear Matte VarnishGlazing Medium
Elegant finish Metallics  in Renaissance Brown and Emperors Gold Metallic Lustres in Iced Espresso, Copper Kettle,  silver spark,  Black Shimmer.
Texture Fierro  Iron Green
The skull  is a Smeared Ink digi
The rubber stamps are from the Stempelwinkel, the skull/cross bone is a clear stamp, brand unknown
the shrine is made using the vintage cabinet card die and card board, and the fence is the die in the pic


I die cutted (is that a word?) the vintage card 6 times, 2 were given the same treatment as the Dragon Book, see how to here (as a matter a fact I die cutted those 2 from my test piece. I tried this aging  technique on the cardbord first before using it on the book. So glad I saved it cause it saved me a lot of work for this LOL)
The 4 other vintage cabinet cards were glued together. I glued one of the ages cards on the top (aged side up, doh!). Cut the hole out using a ruler and craft knife, safe the aged piece you cut out.
glue the other aged card on the back, (aged side to the back, so you see both aged sides)
see pic
the square aged piece you cut out the first card will be glued in the hole, aged side up, now all sides have a nice aged look and only the sides have to be aged (inside the hole and around the card) but first stamp all the skullies.


To age the sides I used Texture Fierro, apply using a palette knife. Let Dry and add some Elegant Finish Metallics
The flower is also a Tim Holtz Die, same as the ones I used for the Dragon Book, this was a left over from that I explained how to make them here.
The skull is printed twice , cut out and layerd using foam tape to create some dimension, distressed with glossy crackle accents and walnut stain distress ink.

that's about it, go check out the other minions blogs to see the amazing skull projects they made


I will enter the following challenges
http://leftofcenterchallenges.blogspot.co.uk/p/loc-1st-anniversary-challenge-starting.html

Tuesday, March 18, 2014

Dragonbook

Another Steampunk project to show you, made for Just Steampunk magazine vol 5.
A lot of pics to show you , this project needs a lot of drying time in between aal layers of paint and varnish,  prepping the book will take some time too.

It's best to start with the inside of the book and add all decoration on the outside last

 Making this book took several days, just so you know this is not a quick and easy project to make.
It's a lot of fun to use all the different techniques (thanks Rick for giving some aging tips, you're the best),  you will need some patience :-)
I will try to explain what I did


Supply List

Digital dragon image by Rick St. Dennis MFA

Deco Art products used:
Dazzling Metalics Venetian Gold
American Acrylics, colours: Mocha, Sable Brown, Sand, Lamp black, Traditional Burnt Umber
Americana Gesso, Decoupage, Weathered Wood Crackle Medium, Dura Clear Matte Varnish, Glazing Medium
Elegant finish Metallics  in Renaissance Brown. Metallic Lustres in Iced Espresso, Silver Spark, Copper Kettle, Black Shimmer.


An old book (I used a new one, the one in the pic above, but any book will do) Ruler, Craft knife, Achival Jet Black stamp ink. Gear stamps, I used rubberstamps by Kicostamps (Steampunk plate 1 and 41), embossing pen, Alphabet stamps, Walnut Stain Distress ink, Kitchen towel, old tooth brush, black cardstock and thin card board (cereal box will do fine)

Foam tape, Metal foil tape (hardware store), Ranger Crackle accents, Sizzix Dies; Hardware Findings, Gadget Gears, Elegant Flourishes.
Cuttlebug embosing folder Textile texture, Sizzix Alterations embossing folders Diamond Plate and Riveted Metal


How to:


The dragon (a Rick St. Dennis MFA Digital stamp)

Print the dragon image on sturdy paper, colour (make a laser print colour copy cause you will need the head on the front of the book, and this way you don't have to color it twice)  and cut it out add foam tape to the back and attache it in the shadowbox, (I used distress ink to give the dragon the same aged look as the book after colouring it)


The outside of the book.

First gesso it till you can't see what was on the cover of the book, you need a white background to start with. Let dry.

First layer paint is the gold, when dry add weathered wood crackle medium. Use  Mocha, Sable Brown, Sand acrlic paint and a kitchen towel (make a puff dabb in all three colours and dabb it on the cover to create a marble look) as the top layer for the crackles. Let dry and add 2 layers of Matte Varnish, when dry , make a glaze using traditional burnt umber and Glazing medium, add the glaze on the book using a brush and dabb it off using kitchen towel (make a puff again) next layer is the glaze but use the kitchen towel puffs to add it this time. Keep doing this till you like result. Let dry.
Next add some lamp black to the glaze and use a tooth brush to splatter some of the glaze on the book, carful use a fine spatter. Let dry. Add 2 layers of matte varnish (let dry in between layers) to protect the paint.


Die cut all the gears and other parts using the card board, emboss them and paint them black, then use metallic lustres to give them a metal look. Take the piece of black cardstock cut to size to be able to make a frame and emboss, use the metallic lustres to age.
The colour copy dragon, cut out the head in a way it will fit in the frame you made. add glossy accents crackle to the dragon image, let dry, age with distress ink. Use foam tape to adde the frame to the dragon image and make it a bit more sturdy by adding it to a piece of cardboard, use foam tape to attache to the book cover. Add the embellisments (gears, flowers, hinges) Decorate the hinges on the spine with some pearls or rhinestones.


The inside of the book

there should be some pages on the side oposite to the shadow box that will be cut out of the pages of the book. decide howmany you want on that side, glue the pages where you will be cutting the hole in on the 3 sides of the paper using Decoupage, make sure the pages stay together when drying use clamps for that.

do the same with the pages on the otherside of the book

When glue is dry and pages stick together start cutting out a hole to to create the shadow box, use a ruler and craftknife.
when done glue the pages on the inside of the hole same way as you did on the outside


 use metal tape on the pages to create a metal look, use ruler and embossing pen to make the riveted metal look, when done add lampblack acrylic using a sponge, not to much, go for a mottled look by dabbing the sponge on the metal tape. Let dry.

Stamp the quote using Archival Jet black and paint them over using lamp black acrylic paint, when dry stamp the border using the gear stamps.


Age the sides of the book using lamp black and Metallic Glaze in Renaissance Brown


this was the dragon before it was cut out and distressed


I will enter this book in the following challenge

http://toptiptuesday.blogspot.nl/2014/03/challenge-metal-or-faux-metal.html

http://digisketchchallenge.blogspot.nl/2014/03/fantasy.html

http://www.theartisticstampercreativeteam.blogspot.co.uk/2014/03/march-challenge-letters-words-and.html

http://lejdesignschallengeblog.blogspot.ca/2014/03/lej-designs-challenge-for-march.html

http://alohafridaychallenges.blogspot.ca/2014/03/aloha-friday-challenge-19-things-with.html

http://eclecticpaperie.blogspot.ca/2014/03/eplay-challenge-alter-book.html

http://leftofcenterchallenges.blogspot.co.uk/2014/03/challenge-27-favourite-books-with.html

http://www.vintagejourney.com/2014/03/challenge-1-anything-tim-and-dt-call.html

http://rheddscreativespirit.blogspot.co.uk/2014/03/march-challenge.html

http://leftofcenterchallenges.blogspot.nl/p/loc-1st-anniversary-challenge-starting.html