Followers

Showing posts with label valentine. Show all posts

Tuesday, January 24, 2017

Heart Canvas


Check out The Sin City Stamps blog here, to find step by step how to make the canvas and more pictures of this Valentines Heart Canvas 


Supplies used:
Sin City stamp set Skeletons Halloween
Sin City stamp set Wing it
Canvas 10 x 10 cm
Tissue paper
Deco Art Americana Acrylic paint in : Desert turquoise, True Red
Deco Art  Media Fluid acrylics in Cobalt Teal Hue and Primary yellow
Deco Art Dazzling Metallic paint in Shimmering Silver
Deco Art Triple thick gloss glaze
Deco Art decoupage glue for napkins
Archival Waterproof stamp ink in black
Sizzix Alterations Heart wings die and machine
Canvas 10 x 10 cm
Tissue paper
Chipboard ( I used a box from a frozen pizza)
Craft mat
Paintbrushes
Baby wipes or wet cloth
Permanent black marker.
Adhesive

Monday, January 23, 2017

Valentine tag

Almost Valentines Day so here some inspiration for a Tag, using a Rick St.dennis Hatlady


Deco art products used : Americana acrylic paint in Lamp Black,  Boysenberry Pink Tomato Red.
Americana Multi Surface Chocolate metallic. Americana Decoupage Napkin. Deco Art Media Gesso
Deco Art stencil  Urban Ink Beliefs.


Cut the tag out of chipboard and gesso it. Next paint it red and use the stencil with the pink paint to make a background.

Next use the stencil to make the hearts in Chocolate metallic. The Follow your heart senti is also stencilled using black paint
Color the digital stamp of a hatlady by https://rick1949.zibbet.com/Rick St. dennis, cut it out and glue to the tag using Decoupage napkin.

Add a ribbon and charm.

Monday, January 11, 2016

Heart canvas again

This canvas was inspired by Amy Pearce. I saw a video she made and thought to try and paint my own version.

this canvas is for sale see here

Deco Art products used: Americana Acrylics in : Sour Aple, Desert Turquoise. Bahama Blue, Red alet and Snow White. Traditions acrylic paint in Carbon Black and Red Violet. Acrylic Gesso and Americana Deco Page matte.


First gesso the canvas and when dry add a layer of Red Alert paint. Take a piece of tissuepaper large enough to cover the canvas and the edges. Crumple the tissue paper to get a lot of creases and glue it to the canvas using Decou Page Matte. Use a layer of Decou Page on the canvas, add the tissuepaper in a way the crumples stay in, and add a layer of Decou Page over the tissue paper. Let dry.

Next take a pencil and draw the outlines of the heart. Take a clean paintbrush and water and wet the inside of the heart. Start painting the heart while the water is still on the heart so the different paint colours will easily mix. starting with Red make shadows with Red Violet and use Snow White for the highlight. Add more RedViolet  (you can even add a little black to make it a bit darker) and go from the shadow side of the heart to red in the middel to bright red and white on the highlight.
Use the highlights and shadows to shape the heart.
Let the heart dry. For the background wet the rest of the canvas using water and a paintbrush again.

Use the Green, Turquoise and the Blue to paint the background, Let the colors mix and play with the paint till you like the result.

Use Red Violet to add the shadow of the heart on the background and let it fade into the Blue/Green
Let the canvas dry and use a paint brush with a little red violet paint on the flat side to gently add some paint on the raised parts of the tissuepaper. While doing this on the heart I added a bit Black to the Red Violet so it would show better.
Create a bit of a border in Red Violet around the edges of the canvas

I will enter this canvas in the following challenges

http://moremixedmediachallenge.blogspot.co.uk/2016/01/more-mixed-media-challenge-blue.html

Sunday, January 25, 2015

Valentines

Over at Airless Chambers and at Sparkle and Glitter, my teamies and me are showing Valentine images in non traditional colours, so we were not allowed to use Red, Pink and Yellow,


no problem at all enough colours left :-)


 The background is Deco Art Americana acrylics in : Spiced Pumpkin, Lamp Black, Titatnium White and Neutral Grey, the quote is handwritten using a Deco Art Glass paint marker


 The image is a Rick St.dennis digi called Macabre Valentine and can be foun here in Zibbet and Etsy


Saturday, February 1, 2014

Happy Heart day

Today the new challenge starts over at Sparkle and Glitter, the only rule is to use the Rick St.dennis  February monthly image, which is ofcourse Valentine themed :-)

This little cute chap is called Happy Heart Day and you can fnd him here, the good news is that he is free if you buy an image in Rick's shop till February 15th.

 Happy Heart Day is coloured using Derwent Colour Soft pencils


I made an art journal page using a gelli print and DecoArt Americana Acrylics, colours used: Lemon Yellow, Red Alert, Purple pizzazz, spiced pumpkin.

The letters are stamped using Making Memories Valentine foamstamps and Americana Acrylics, colours used : Lamp Black and Cherry Red

if you go to Sparkle and Glitter you can see all the different coloured images using Happy Heart Day by the rest of the Elite Design Team.

I also have some coloured mages to show you,

Rick drew an amazing Mad  Wonderland set of images, Alice, the Tweedles, Queen of Hearts, March Hare, The White Queen, The Duches and of course the Hatter, and they are all slightly mad.....

so far I only had the chance to colour the hatter (I used Caran dáche Luminance 6901 pencils for the hatter), here he is

the other images I got coloured are Etoile (Caran dáche luminance pencils used but not completly finished) and Glinda the Good (Derwent colour soft)


I will enter the valentine aj page in the following challenges

http://notrealstamps.blogspot.co.uk/2014/02/valentine.html

http://delightfulsketches.blogspot.nl/2014/01/weekly-challenge-anything-but-card-love.html

http://stampwithsarahkay.blogspot.nl/2014/01/challenge-204-valentines-day.html

Monday, January 27, 2014

Rotten Love Challenge #181 at Haunted Design House

Today the new challenge starts at Haunted Design House, theme is Rotten Love and we are being sponsored by Delicious Doodles,check the Haunted Design House blog for all details and inspiration from my fellow minions, would be nice if you left them  some love on their bloggies, life is hard in the Dungeon, so they can used some nice comments :-)

I made a canvas, Valentine themed ofcourse, using a Delicious Doodles image called Angel of Death
 Products used


Glamour Dust glitter paint in black ice and Sizzling red.
Dazzling metallics Shimmering Silver, Metallic Lustre Iced Espresso.
Tim Holtz Dies: Ornate Crosses,Winged Heart, Graveyard edge.
A Cuttle bug embossing folder Textile Texture, and the Fence Die.
 A closer look at Angel of Death (coloured with Derwent color soft pencils) the stamps in the background are Tim Holtz Valentine stamps, the blood splatter is a Stampinback stamp.
 I used the back of a canvas and covered the edges using Texture Crackle, the cracks appear when it dries. Added some Metallic Lustre to the crackle and the fence die and the cross
 Painted the roses red  using the glamour dust glitter paint
Painted the wings and the crown using dazzling metallic paint, the heart using glamour dust glitter paint. when Dry I stamped the batwings to the wing die and added the senti to the heart. Covered the Heart, wings and crown with one step crackl emedium. Let dry and cracks apear
rubbed some distress ink in the cracks to make them more visable

final touch some bling on the crown, that;s it

Can't wait to see your entries in the challenge


I will enter this in the following challenges
http://cardmaniachallenges.blogspot.nl/2014/01/cmc39-angels-andor-fairies.html

http://www.throughthepurplehazechallenges.blogspot.nl/


Tuesday, February 12, 2013

bloody valentine day 2 and mermaid card

This is day 2 for the bloody Valentine hop by Smeared Ink (blog roll at the end of this post), I made another tag using a Rick St. Dennis Zombie be mine digi, the brains in the back ground is a rubber stamp from de stempelwinkel.
now isn't he cute......
 
 
and I finished the mermaid card, using Sirena
 
it's a simple card, just added some pearls and layered the image. I added glitter to the mermaid's tail, but
 you can't see it very well, on the pic below it shows better.
 
See you tomorrow for day 3 of the bloody valentine hop
 
Blog Roll


Shell
Black Dragon
Susan S.
Monique
Sandy
Jane
Abbie
Leigh
Wendy
Lady B
Ike
Kristy


I will enter the zombie tag in the following challenges:
http://gloomy-art.blogspot.co.uk/2013/02/ga-055.html

http://lilredwagon.blogspot.nl/2013/02/challenge-172.html (hey I know it's a zombie, but i used the word " love " lol


Monday, February 11, 2013

GDT Forever Friends challenge and Bloody Valentine

two and a half projects for you to share, two valentine and I colored image

will start with the GDT piece for Forever Friends Challenge # 55 which is sponsored by Rick St. Dennis MFA. The theme is anything goes, so I did a Valentine Tag. Hope you will join in the challenge.
 
 
Second project is for the Bloody Valentine blog hop by Smeared Ink
 
Blog Roll

 
and i made another tag for this
 
the digi is Smeared Ink  and the man stamp is from de Stempelwinkel
 
and here is the half project LOL
 
it's a new mermaid digi by Rick St. Dennis, and I only had time to do some quick colouring, so it's not the best coloured image ever LOL
but think the mermaid is gorgeous so wanted to share with you anyway
 
see you tomorrow for day 2 of bloody Valentine hop
 
I will enter the valentine hat lady tag in the following challenges:
 

Saturday, February 2, 2013

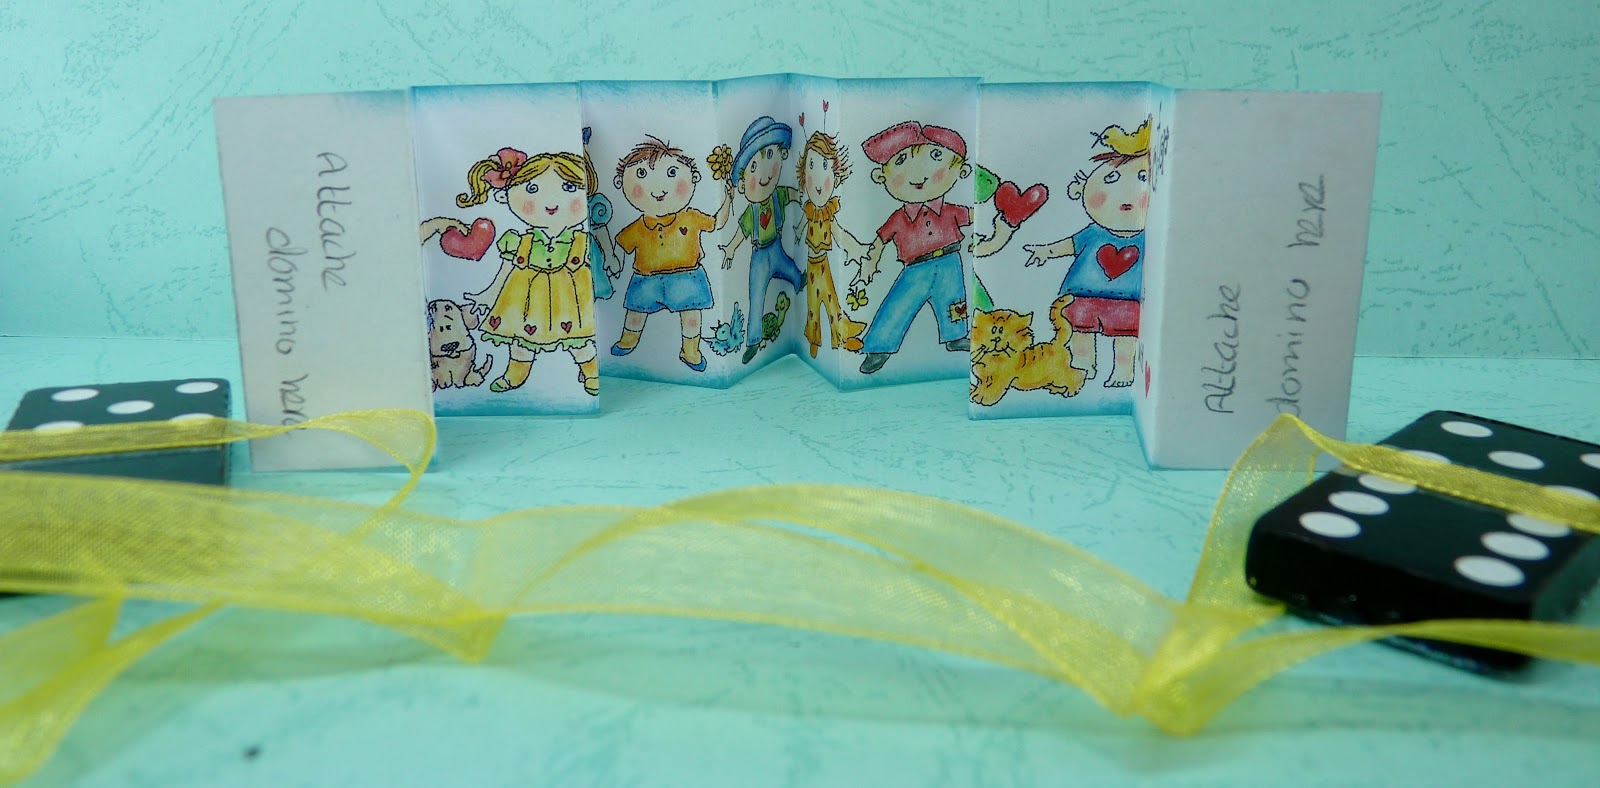
Valentine / Easter Domino Book

Rick asked met to do a domino book using his digi's, that was earsier said then done, cause you need small images and they have to be put very near next to each other to get a nice looking book.

I tried to use some of his excisting images but couldn't make it work well enough, so Rick drew these special images, that would fit perfectly.

It was fun to kind of make this together in cyberspace, me giving the measurements for how big all the images should be to fit the dominoes,  Rick drawing them and then me colouring and assemble the book.

Colouring these small images was a bit challenging, but fun to do, here a lot of pics and a tutorial how to make this book, the digi's needed for this are freebies on Rick's blog this weekend only and after that they will be in his etsy


Domino book tutorial

What you need:

Rick’s domino digi’s, 2 dominoes, Ribbon, Glue,  Double sided tape,  Bone folder, clear embossing powder, heat gun, Stickles
 
First measure the dominoes, you may have to adjust the size of the digi to fit to your dominoes.
 

Print the digi’s double sided  (I first printed them on two different  pages , glued them back to back in the way they should be. and  then copied double sided)
 
Colour the images for the front and the back of the book , glue them on the the back side of the domino (leave some of the edges of the domino visible to make it easier to seal them ) and put some versamark ink over the image and the domino’s  and put clear embossing powder over the image and the edges of the dominoes, heat with heat gun (don’t panic if  the first layer is not smooth) and repeat till you got 3 layers. Let cool and add stickles around the edges and let dry

 
First colour the images on both sides, then cut to fit the dominoes and accordion fold like the pics above.  You have to leave a blanc space the size of a domino on the valentines side to attache the dominoes.
 
 
Use double sided tape to glue the ribbon to the domino,  in the same way as in the pic,  Domino has to be in the middle and the ribbon should be big enough to tie a bow  on both sides of the domino.
Then glue the book to the dominoes as in the pic (use a liquid glue so you can move the book a bit while glueing so everything will be straight)
This is the book when closed with the bows.


Friday, February 1, 2013

Hugs and Hearts

The new challenge at Sparkle and  Glitter with Rick St. Dennis is "hugs and kisses"  what else would it be,  cause almost Valentines.

I used the  Vampire Valentine  digi to make a tag, lovely couple aren't they?


hope you will join the challenge can't wait to see what you all will make
 
I will enter this tag in the following challenges
 
http://haunteddesignhouse.blogspot.nl/2013/01/hdh159-famous-last-words.html (words aren't famous but sure are the last word is this life LOL)
 

Monday, January 7, 2013

Snow globe

another Valentine project, I made a snow globe using a Rick St. Dennis MFA digi

below the pics you will find how I made it (Also see Rick's blog for more details and ideas)


you will need a jar, glitter,ribbon, liquid glycerin, distilled water, a glue gun, laminator, some decoration

first clean the jar and the lid


I first coloured the cupid and cut him out (use some sturdier paper to print the digi on)

then laminated him to make the digi waterproof and cut out again (you have to make sure to cut around the image in a way that keeps it sealed in the plastic)

glue the laminated digi to the inside of the lid using glue gun and add some decoration, I used hearts and silk roses.  (make sure you can still put the lid on the jar when everything is glued on)

put some glitter in the jar and fill with distilled water and add some liquid glycerin so the glitter won't drop to the bottom immediately but will float a bit

put the lid on the jar and check if it is waterproof, to be sure you can use the glue gun to glue the lid on the jar to make it waterproof if it is still leaking

glue some ribbon around the edge of the lid

I am entering the following challenges:

http://eclecticellapu.blogspot.co.uk/2013/01/new-year-and-new-challenge-for-purple.html  snow much fun ( Snow globe has glitter snow in it, duh!)


http://onestitchatatimechallenge.blogspot.nl/2013/01/challenge-145-new.html  (first time I made one of thes, so totally new to me)

http://pennyblackatallsorts.blogspot.nl/2013/01/january-challenge.html love is in the air challenge (cupid is inside the snow globe and lots of hearts)

http://challenges4everybody.blogspot.co.uk/2013/01/challenge-11-anything-goes.html Anything goes

http://stamptacularsundaychallenge.blogspot.nl/2013/01/challenge-197-dont-be-square.html

http://craftymesschallengeblog.blogspot.co.uk/2012/12/24th-challenge-show-some-sparklebling.html

http://simonsaysstampschallenge.blogspot.nl/2013/01/new-something.html first snow globe i ever made so that's new for me