Followers

Showing posts with label rsd. Show all posts

Monday, June 15, 2015

June bugs the Finnabair way

For the challenge June bugs at Haunted Design House it was my turn to make an inspiration project, it had to have bugs, gems and be scary ofcourse (read all the rules, see the winners and other inspiration, and enter the challenge here), can;t wait to see what you all come up with

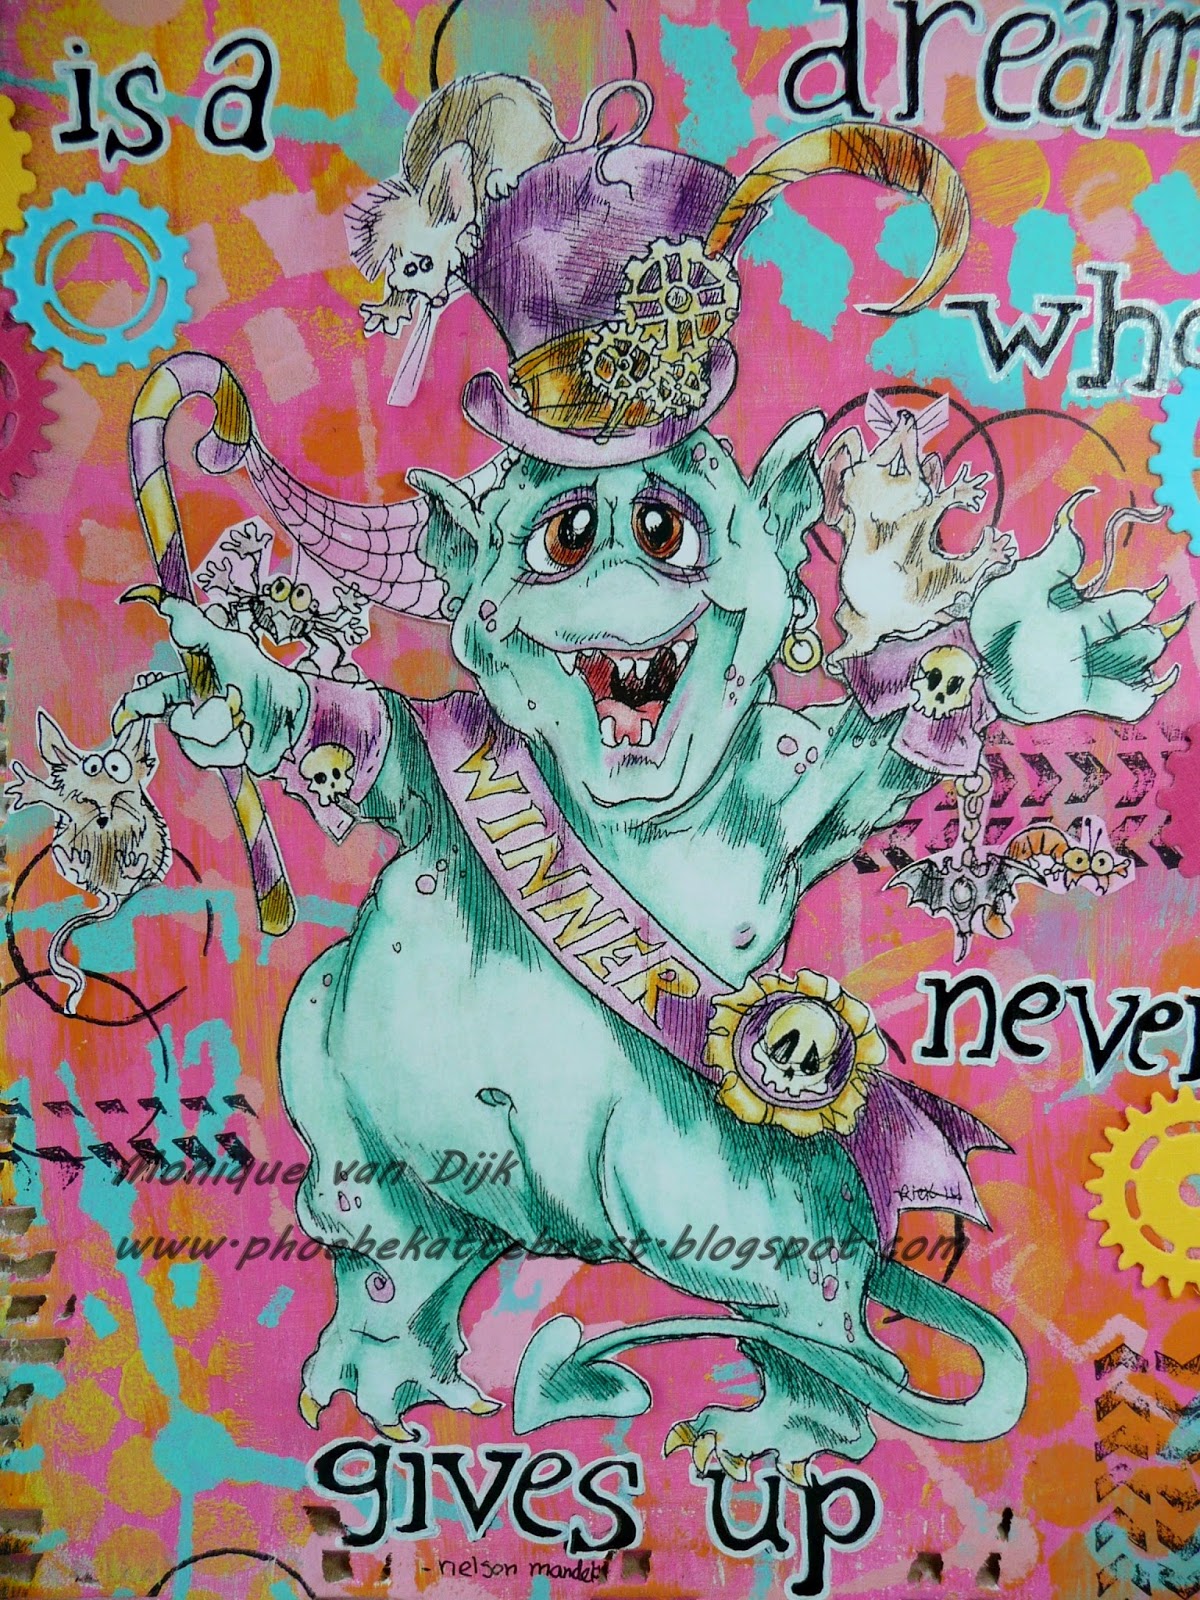
So here it is a Finnabair inspired alterd tray, well the back of the tray is the part that got turned into a canvas :-)


The digital image is a digi by Rick St. dennis specially made for these kind of projects, you can find her here, this pretty lady is called Countess Von Finnbair .


Deco Art products used:
Americana Acrylic Gesso , Modeling Paste and Americana Acrylic in Lamp black.  Media Fluid Acrylics Interference paints in the colors: Violet, Gold, Turquoise, Blue, Magenta and Green. Andy Skinner stencils: Shedded and Snake's web. Metallic lustres in : Silver Spark, Majestic Purple, Elegant Emerald, Cosmic Blue. Glamour Dust Glitter paint in Black Ice

you will also need  a wooden tray, plastic bugs and some dies: Tim Holtz; Gadget Gears and Tatered florals, Graveyard and a movers and shapers Bat. The web is from Memory Box

I started by colouring the image, I used Prismacolor pencils ( the 75 yrs anniversary set, it has the 50 most popular colours in it so a bit different than the 150 I was used too, but turns out 50 is enough lol)


So just colour up the Countess and cut her out, the big bold head will be covered with all kinds of stuff sooo just have fun with this
Meanwhile I had gessoed the back of the wooden tray and used the stencils and modeling paste to create some texture. (tip  make a mask the shape of the head so that part of the canvas gets no modeling paste on it, makes it easier to glue the image on)

Let dry.

Next paint everything black, (you can also use black gesso and black modeling paste both also by Deco Art). the trick with the interference paints is that they show up much better on a dark background so that is why I painted everything black ( all bugs and stuff that is glued to the head was also gessoed and painte black first)

So now it is time to go crzy with the interference paints, they are like magic, shake the bottle and put a bit on a pallete, and you will see no matter which colour you take, what comes out of the bottle is white and you see a shine in the colour that is on the bottle. When you paint this over (dry) black paint the colour comes out and the shine, soo much fun.

 just add the different colurs randomly, if you dont like the result, use black paint to cover, let dry and start over :-)

Next is is time to collect emmbelishments, I used die cuts and some keys, bugs light bulps , skulls and Skellie hands, charms, flowers anythingnyou like, I painted everything before glueing it on.

the spiderwebs in the cormer are made from black cardstock covered with Metallic Lustre in different colours. I used soem Silvdr to adde to the gears and the flowers (made of die cuts and embossed before painting them, to give them a metal look, I used the sizzix embossing folders diamond plate and riveted metal)


Glue the head in the on the canvas and make a nice composition with all embellies, (take a pic with your phone, so you now where you have put everything and start glueing)


Hope you like the result,


BTW check out the RSD fb group Rick is asking for your ideas for rubber stamps, so all input is welcome, if you would like to see Rick's darker images as a rubber stamp please go here and let him know what you are interested in.

I will enter this in the following challenges

http://mixedmediaworld.blogspot.co.uk/2015/06/mmw4-masculinefathers-day.html

http://www.sparklingblackrose-craftmylife.blogspot.co.uk/2015/06/all-crafts-challenge-junejuly.html

Monday, June 1, 2015

RSD progressive challenge part 2

Todau starts the new challenge at Sparkle and Glitter, part 2 of the Rick St.dennis Progressive challenge. The part 2 challenge always has a free image to be used. Everyone that has entered part 1 can get one, see for details the Sparkle and Glitter blog. If you did not play in part one you can buy it here


I used Mr Tea without the sentiment and made a Tea bag holder


DECO ART products used :  Decou Page Matte, Triple Thick Gloss Glaze, Glamour Dust glitter paint in Black Ice and Sizzling Red.
Deco art Media products: Crackle paste, Fluid acrylics in Cobalt Turquoise Hue and Raw Umber.
Americana Gesso, Traditions Acrylic in ultramarine blue.

The tea bag holder is a wooden do it yourself package, so I glued it together and gessoed it. Next was a layer of ulramarine blue to show up in the cracks. Next I addded crackle paste and when dry I used the Cobalt Turquoise Hue to paint it. When dry I added a glaze of Raw Umber Media Fluid to age it a bit.
I coloured Mr Tea using my Polychromos and cut him out. Decou pages him on the teapot and tried to get the cracks in the image (did not work out as planned). When the Decou Page was dry I added 2 more layers to seal it. Left it to dry and added the card symbols using glitter paint. Wrote a senti on the back of the teapot and finished the piece with 2 layers of Triple Thick Gloss Glaze for both protection and shine.


Hope to see you in the challenge

i will enter the following challenges

http://rheddscreativespirit.blogspot.co.uk/2015/06/our-june-challenge.html

http://notjustcardschallenges.blogspot.co.uk/2015/05/challenge-20.html

http://cagichallenge.blogspot.ca/2015/05/distress-it.html

http://thatcraftplaceblog.blogspot.co.uk/2015/05/new-challenge-shabby-chic.html

http://welove2create.blogspot.co.uk/2015/05/challenge-11-anything-creativemixed.html


Thursday, January 1, 2015

new RSD progresive challenge January part 1

Happy healthy and  creative New Year to all of you....


Time again for a new Rick St.dennis progressive chalenge, see how things work here, the rules are in the side bar of the Sparkle and Glitter blog, it's fun and if you join tis part of the challenge you will get one free image to use in the next part of the challenge, so you all will be winners :-)

I made an Art Journal page using the Carousel Horse a Rick St.dennis digi ofcourse. It's coloured using Prismacolor pencils and cut out and glued to a backgound I made using Deco Art Americana acrylic paints
colours used: Red Alert, Purple pizazz, Spa blue, lilac, Spiced Pumpkin and Lemon Yellow.
Some stencils and the quote came frome the internet, It's handwritten using Deco Art glass paint markers (those are one the few markers that can write over Acrylic paint, permanent markers just stop after a few letters).

 You can find the Carousel Horse here 


Hope to see you in the challenge soon,  O  and Rick is still having a sale, this will last till January 15 th and you will need a discount code , see below

For Zibbet

Any sale over 10.00 can get 25% off ZIBBET only

code: 25off2014endofyear


And for Etsythis code will get 40% off on any sale over 40.00 ETSY only!!

code :  2014CLEARANCE400VER4


I made another page in my leather journal,


Paints also DecoArt Americana in Red alert, saffron yellow, Tangeringe , lamp black and Traditions paint in Purple passion. the reaper is a Andy Skinner stencil by Tando and the samps are from de Stempelwinkel

Thursday, August 14, 2014

Mermaid canvas

Hi all, I am back again.


I started this canvas early May, but some tings got in the way so I could only finish it just before I let for the USA. I had planned to do a tutorial about this and I did make pics along the way.......but .....somehow I lost a part of the pics.

so I will try to talk you throught the part where pics are missing, sorry


Deco Art products used:  Elegant Finish Metallic Glaze (in Medieval Gold and Old World Patina)
Weatehered Wood Crackle Medium, Texture Fierro in Green Gold, Decoupage Matte, Americana Acrylic paints in colours: Driftwood , Antique Mauve and Colonial Green. Metallic Lustres in colours: Gold Rush and Iced Espresso. I also used Acrylic Gesso to prepare the canvas for painting. And a Matte Varnish.


The digital image used is Aquarella, by Rick St.dennis. for embellishments I used shells, drift wood some pearl beads and a net. You will also need paper towels.


First Gesso the canvas, while drying start colouring the image, I usually use the drying time in between paint layers to do some colouring.


When gesso has dried paint the canvas gold using the Elegant Finish Metallic Glaze, you may need multiple layers .Let dry in between. When  dry apply a layer of Weathered Wood Crackle medium, let dry.

take the 3 colours Americana acrylics and put some paint on a craftsheet. Take some papertowel and make a puff.
Now it's gonna get messy lol,  dabb the papertowel puff in the paint, while doing this turn the puff a bit so paint will be a bit mixed, but careful not to make mudd. Then immediately dabb to the canvas and keep turning the puff while dabbing. You might want to practise this on a scrap piece of paper. You want to create a marble like look. Change papertowel puffs if the paint will get to much to be one colour. See pic below, that is the result you want. Work fast because if you over do the paint the weathered wood won't work.


Let dry and let the crackle start, when the canvas has dried you have a marble look finish, with cracks, throught the cracks you will see some gold. Protect it with a layer of matte varnish

From here the pics are missing, but next step is easy. Paint you embellishments to match the canvas, using the Elegant Finish Metallic Glazes and the paint. Let dry .


cut the digi out and glue it to the canvas

Take the Texture Fierro and a palette knife to apply it round the edges of the canvas to create a frame, don't forget the edges of the canvas. Let it dry and crack. Add some Metallic Lustres to some of the raised areas.


glue the embellishments in place (try to put the net in between, under and over some of the embellishments), for the loose ends of the net, use Decoupage Matte on the net to make sure it stays where you want it. Let dry.

when theDecoupage Matte and glue  is dry turn the canvas around so the backside ist up, Attache the remaining loose ends of the net on the back of the canvas using Decoupage Matte or glue. Let it dry and you are done.


I will enter this in the folowing challenges


http://cagichallenge.blogspot.ca/2014/08/fish-or-fishing-challenge-this-week.html  mermaids are a fish aren't they, well partly anyway


Sunday, June 15, 2014

Rick St. dennis progressive challenge part 2 inspiration

see all about the chalenge on the Sparkle and Glitter blog here, there is still time to enter, you can find the you're a winner Nyner the little monster here, you will need this guy to enter the challenge.

I used mine to have some fun with a piece of card board that came from a box, yep recycling here LOL

Well it's cheap and it's fun so why not use something you would throw away and alter it to something nice.

To do the trick I used Deco Art products (Gesso, and Americana Acrylics, coulours: Lamp black, Carousel Pink, Lemon Yellow, Bahama Blue and Tangerine and an Americana Mixed Media stencil called Timeless Treasures), also used some stamps and a gear die. and ofcourse Nyner, the Rick St.dennis digi


 It's super easy, take a box, cut one of the sides off , tear soem of the paper off, and Gesso, let dry.
Paint in your fav colour , I used the carousel pink, and use the stencil to get the clocks on, use different colours  and overlap some of the colours with another colour paint. I used a sponge for the stenceling.
You can always smudge some paints on the backgound using the sponges as well. Jut go all painty till you like the result.
Next step was the stamping, I used Archival Jet black and a circle  and arrow stamp. Colour the digi, cut it out and see where you want it to be on the cardboard. Add senti, in a way you still can read it after the image is glued on, that doesn't mean you have to avoid all letters, if you overlap the image most of the time the senti will still be readable, but it is something you want to think about when you start writing.
I found the senti on the net, it's by Nelson Mandela.  To finish abd for the extra steampuk feel I used cardstock in tuquoise , pink and yellow to die cut the gears.


hope you like, to see all other project by my fellow teamies , check here

Also there are challenges on facebook and Rick has hi own persononal red white and blue challenge.
check out sparkle and glitter for all info and links

Thursday, May 1, 2014

challenges again

We will have a progressive challenge in Sparkle and Glitter starting MAY 1-The first challenge will be Steampunk and you must use a Rick St dennis DIGI image in order to enter-this challenge is in honor of Volume 5 of Just Steampunk which will heavily feature the EDT ladies projects...

All those who enter the May challenge (with an RSD image) will receive a special 'FREE' image in order to do the June Challenge and the BIG WINNER of the June Challenge will get a free image and a discount code.

go check out the creations the EDT made for the magazine on Sparkle and Glitter and hope to see you in ths challenge


here my cards that were published in vol 4 of Just Steampunk magazine


 image used Steamee mc Punk


 and using one of the hat ladies, this one is called 1880 Hat some more here on etsy
here a scan of the page  in the magazine :-)

Wednesday, March 26, 2014

Left of the Center Challenge blog anniversary day 20

Left of the Center is one of the blogs I play if I have the chance, the challenges are always non cute, so I guess that's why I like to go and play there LOL. This month LOC has an anniversary challenge, it lasts whole month and there a great prizes to be won and lots of inspiration to be seen, so go check it out.

Maureen, (usually Mo, but a bit confusing, so we talk to each other as "the other Mo" which I guess doesn't make things easier) asked me if I wanted to do a GDT project for the first anniversary, sure, why not....so here it is,.... my offering for the LOC anniversary is an Art Journal page using the Rick St.dennis MFA Vampyr Masquerade digi


 the background used is a gelli print as base and added some stenceling, the stars, and the funny looking plant, and the circles on the edges. Paints used are all DecoArt Americana Acrylics, colours used: Red alert, Spiced Pumpkin, Winter Blue, Purple Pizzazz, Carousel Pink, Sour Apple, Moon Yellow.

The Vampyr Masquerade image is coloured using Derwent Coloursoft pencils, the senti says: "I love the night, it's the only time I feel really alive.

Thanks Mo for asking me and a happy anniversary to LOC


I will enter this in the following challenges':

http://leftofcenterchallenges.blogspot.nl/p/loc-1st-anniversary-challenge-starting.html

Tuesday, March 18, 2014

Dragonbook

Another Steampunk project to show you, made for Just Steampunk magazine vol 5.
A lot of pics to show you , this project needs a lot of drying time in between aal layers of paint and varnish,  prepping the book will take some time too.

It's best to start with the inside of the book and add all decoration on the outside last

 Making this book took several days, just so you know this is not a quick and easy project to make.
It's a lot of fun to use all the different techniques (thanks Rick for giving some aging tips, you're the best),  you will need some patience :-)
I will try to explain what I did


Supply List

Digital dragon image by Rick St. Dennis MFA

Deco Art products used:
Dazzling Metalics Venetian Gold
American Acrylics, colours: Mocha, Sable Brown, Sand, Lamp black, Traditional Burnt Umber
Americana Gesso, Decoupage, Weathered Wood Crackle Medium, Dura Clear Matte Varnish, Glazing Medium
Elegant finish Metallics  in Renaissance Brown. Metallic Lustres in Iced Espresso, Silver Spark, Copper Kettle, Black Shimmer.


An old book (I used a new one, the one in the pic above, but any book will do) Ruler, Craft knife, Achival Jet Black stamp ink. Gear stamps, I used rubberstamps by Kicostamps (Steampunk plate 1 and 41), embossing pen, Alphabet stamps, Walnut Stain Distress ink, Kitchen towel, old tooth brush, black cardstock and thin card board (cereal box will do fine)

Foam tape, Metal foil tape (hardware store), Ranger Crackle accents, Sizzix Dies; Hardware Findings, Gadget Gears, Elegant Flourishes.
Cuttlebug embosing folder Textile texture, Sizzix Alterations embossing folders Diamond Plate and Riveted Metal


How to:


The dragon (a Rick St. Dennis MFA Digital stamp)

Print the dragon image on sturdy paper, colour (make a laser print colour copy cause you will need the head on the front of the book, and this way you don't have to color it twice)  and cut it out add foam tape to the back and attache it in the shadowbox, (I used distress ink to give the dragon the same aged look as the book after colouring it)


The outside of the book.

First gesso it till you can't see what was on the cover of the book, you need a white background to start with. Let dry.

First layer paint is the gold, when dry add weathered wood crackle medium. Use  Mocha, Sable Brown, Sand acrlic paint and a kitchen towel (make a puff dabb in all three colours and dabb it on the cover to create a marble look) as the top layer for the crackles. Let dry and add 2 layers of Matte Varnish, when dry , make a glaze using traditional burnt umber and Glazing medium, add the glaze on the book using a brush and dabb it off using kitchen towel (make a puff again) next layer is the glaze but use the kitchen towel puffs to add it this time. Keep doing this till you like result. Let dry.
Next add some lamp black to the glaze and use a tooth brush to splatter some of the glaze on the book, carful use a fine spatter. Let dry. Add 2 layers of matte varnish (let dry in between layers) to protect the paint.


Die cut all the gears and other parts using the card board, emboss them and paint them black, then use metallic lustres to give them a metal look. Take the piece of black cardstock cut to size to be able to make a frame and emboss, use the metallic lustres to age.
The colour copy dragon, cut out the head in a way it will fit in the frame you made. add glossy accents crackle to the dragon image, let dry, age with distress ink. Use foam tape to adde the frame to the dragon image and make it a bit more sturdy by adding it to a piece of cardboard, use foam tape to attache to the book cover. Add the embellisments (gears, flowers, hinges) Decorate the hinges on the spine with some pearls or rhinestones.


The inside of the book

there should be some pages on the side oposite to the shadow box that will be cut out of the pages of the book. decide howmany you want on that side, glue the pages where you will be cutting the hole in on the 3 sides of the paper using Decoupage, make sure the pages stay together when drying use clamps for that.

do the same with the pages on the otherside of the book

When glue is dry and pages stick together start cutting out a hole to to create the shadow box, use a ruler and craftknife.
when done glue the pages on the inside of the hole same way as you did on the outside


 use metal tape on the pages to create a metal look, use ruler and embossing pen to make the riveted metal look, when done add lampblack acrylic using a sponge, not to much, go for a mottled look by dabbing the sponge on the metal tape. Let dry.

Stamp the quote using Archival Jet black and paint them over using lamp black acrylic paint, when dry stamp the border using the gear stamps.


Age the sides of the book using lamp black and Metallic Glaze in Renaissance Brown


this was the dragon before it was cut out and distressed


I will enter this book in the following challenge

http://toptiptuesday.blogspot.nl/2014/03/challenge-metal-or-faux-metal.html

http://digisketchchallenge.blogspot.nl/2014/03/fantasy.html

http://www.theartisticstampercreativeteam.blogspot.co.uk/2014/03/march-challenge-letters-words-and.html

http://lejdesignschallengeblog.blogspot.ca/2014/03/lej-designs-challenge-for-march.html

http://alohafridaychallenges.blogspot.ca/2014/03/aloha-friday-challenge-19-things-with.html

http://eclecticpaperie.blogspot.ca/2014/03/eplay-challenge-alter-book.html

http://leftofcenterchallenges.blogspot.co.uk/2014/03/challenge-27-favourite-books-with.html

http://www.vintagejourney.com/2014/03/challenge-1-anything-tim-and-dt-call.html

http://rheddscreativespirit.blogspot.co.uk/2014/03/march-challenge.html

http://leftofcenterchallenges.blogspot.nl/p/loc-1st-anniversary-challenge-starting.html