

all the tea bags that are in the book, aren't these the coolest tea bags ever?

the front cover of the book

the book closes with a ribbon

here you can see the pockets with the tea bags in it

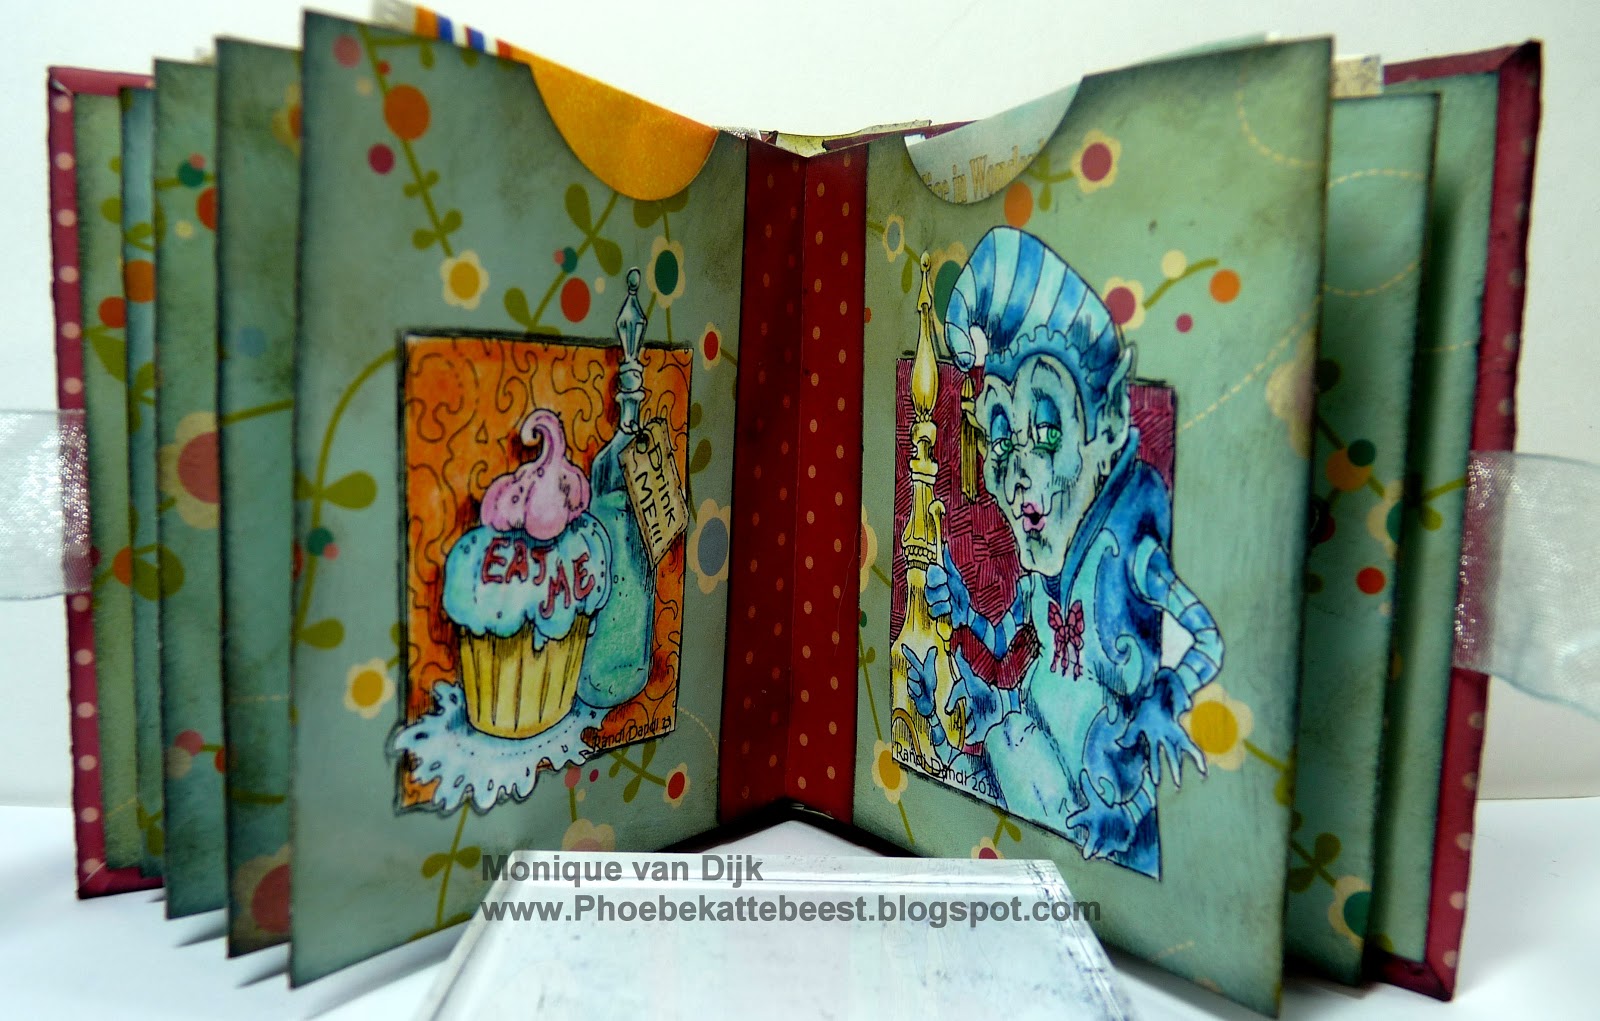
the inside of the book


the back cover

a closer look at all the Rick St. Dennis MFA Images used,
Check out Rick's blog cause there is a special sale for these images


Colouring these was a bit challenging cause I have printed them real small, most of the images are printed at 2 inches, some a little bit bigger
Here is how to make the book
You will need:
6 pieces of paper size: 16 cm wide x 8,5 cm high (6,3 inches x 3,3 inches)

score at 8 cm (3,1 inch)
and fold

then you need 7 pieces of paper from 3 cm wide x 8,5 cm high (1,2" x 3,3")
we are going to use these to bind the book

score at 1,5 cm (0,6 ") and fold

use double sided tape to make pockets of the 6 pages, see below

they should look like this

use a 1,5" circle punch to puch out half circles, to make it easier to slide the tea bag sleeves in and out of the pockets

I inked all the edges and the surface of the paper to give it a bit of a vintage look

attache the small strips of paper to the side of the pocket that is closed with the double sided tape, so folded end is going to bee the side that is visable at the open side of the book.(use liquid glued so you can move it a bit to make things straight) see pic

then add another page to the other side of the strip

do this to all pages see pics


the last to strips are going to have the covers on them, it should look like this

for the covers you need 2 pieces of cardboard of 8,5 cm wide x 9 cm high (3,1" x 3,5")

to cover the cardboard use a piece of paterend paper that is a bit bigger than the cardboard see pic

glue the cardboad in the center of the backside of the paterned paper and cut of the corners, like pic below

score and fold the edges over and glue to card see pic

use double sided tape to attache the ribbon that is going to close the book, make sure it's long enough to tie a bow.

glue a piece of patterned paper on the inside part of the cover, over the ribbon, like this

glue both covers to the remaing strips that bind the book
aline the covers on the backside of the book to the strip, it you donn't do this you will have problems opening the book.
put a strip of patterne paper over the back, to give it a more finished look
see pics below, I also tied a ribbon


I will enter this tea bag book in the following challenges
OMG!! WOW!!! this is absolutely amazing Mo. You are indeed a wonder. Love this xxx
ReplyDeleteAbsolutely stunning. An amazing project. Love how you have coloured the images. The caterpillar looks awesome.
ReplyDeleteWOW WOW WOW this is amazing, what a brilliant creation, I love it all, the colors are so bright and cheerful, Love It, Hazelxo
ReplyDeleteSuch a wonderful project. Thanks for joining our Bright and Cheery Challenge at Created With Love Challenges
ReplyDelete~Chris
wow, this is a fantastic project! Awesome tutorial.
ReplyDeleteSmiles sher
Your mini book is absolutely amazing. Great coloring on all those Alice images. Stopped by from Make It Monday.
ReplyDeleteWhat a cute mini-book! So creative and you're so talented! Thank you for joining us at Cards in Envy and sharing your project and tutorial with us.
ReplyDeleteWOW!!This is incredible!!! you are very talented. Thanks for playing along with us over at Pink by Design :-)
ReplyDeleteThis is a Fabulous Book Monique..and your coloring is Fantastic..Loz
ReplyDeleteVisiting from MIM..
Wonderful and very clever. Also, I can't find your TIO tag on your blog so I will comment here. It is certainly one of the most gorgeous orange and purple combinations I have seen. Wonderful.
ReplyDeleteThis is adorable and I really love it. The details are amazing. But for our challenge at Cards in Envy we require cards only. So I will have to remove your entry from our blog but please visit us again and share a card that fits our "In Envy" requirements for one of our challenges.
ReplyDelete~ Sandy
Cards in Envy Co-Host
Great Job Monique-it was such fun doing this project with you
ReplyDeleteTotally brilliant! Crazily fantastic images - and the whole thing is wild and wonderful, just like Wonderland - fabulous!!
ReplyDeleteAlison x
Woah. Are you kidding me? I'm speechless - this is amazing. Thanks so much for joining us at Movie Madness. :)
ReplyDeleteDit is echt een leuke tutorial, heel duidelijk uitgelegd.
ReplyDeleteDank je om dit leuke boekje met ons te delen.
En ik vind de afdrukjes héél leuk en mooi ingekleurd.
Liefs,
Hilde
Hi Monique - this mini-book is FAB! I love your idea and can appreciate all the work that has gone into making the book. Thanks for the tutorial too! Thanks for sharing your project at Incy Wincy Designs this week in our "Anything But A Card" challenge.
ReplyDeleteHelen x (DT)
Monique.
ReplyDeleteThis is amazing!!!
Thanks for sharing the entire process with us.
And for joining the challenge at Incy Wincy Designs in the "Anything But A Card" challenge.
Trudy, Guest DT
This is awesome! And thanks for including a tutorial, too! Thank you for playing along with Movie Magic Monthly!:)
ReplyDeleteWhat a fantastic project! Thank you so much for the tutorial! And thank you so much for sharing this with us at Make it Monday this week! Don't forget to leave a comment for another entry and mention you saw them on MIM for a chance at our second prize! Good luck and I hope to see you back soon!
ReplyDeleteRene :D
I'm missing words, it's an outstanding project, so many wonderful images and details.
ReplyDeleteGosh Monique what a fantastic project, such a lot of work has gone into it, great images from Rick and you've coloured each one perfectly. Thanks for sharing it with us at Forever Friends Monthly Challenge. Good luck in the draw and I hope you can join us for our next challenge in March.
ReplyDeleteDiane x
Wow this is such a cool project, those images are so wacky and your tutorial is so good Thanks for joining us at A Gem of a Challenge!
ReplyDeleteHugs xx Cara xx DT
WOW! What an amazing project!!!!!!
ReplyDeleteReally nice and beautiful papers and amazing coloring.
I am happy to see you joining us at Gingerloft challenge.
Ardilla :)
Amazing project, wonderful details, great use of the ribbon, thanks for playing at Gingerloft, blessings Hilde
ReplyDeleteYour project is stunning and your attention to detail is outstanding! I would hate to part with this. Thank you for sharing it with us at 613 Avenue Create. Looking forward to seeing more of your work.
ReplyDeleteMonique~I saw this on Sparkle & Glitter & again on FB? I cannot tell you how fabulous I think it is. I think I left you a note one or both of the places. Kristy & I both bought the stamps. I hope I can make something similar one of these days. I'm so glad I was able to come comment on your blog about this absolutely stunning creation! Thanks for playing in our neighborhood at 613 Avenue Create. We look forward to seeing you again.
ReplyDeleteHugs ~
Patti
Oh WOW!! This is FANTASTIC!! What a fabulous idea, and what totally amazing images! Seriously, this is a true work of art! Thank you so much for joining in at ~The Squirrel and the Fox!
ReplyDeletelove Mags b x
Looks like you work hard for this album but it sure is worth it for it came out beautifully. Love the colors you used. Thanks for playing along with us at our Neighborhood---613 Avenue Create! God bless, always!
ReplyDeleteJO ANN
http://jatterburycreations.blogspot.com
This is amazing !!!!! Thanks for joining us at movie magic monthly!
ReplyDeleteWow this is soooo beautiful! Totally love this project. Your images are stunning! So very well colored!!!
ReplyDeleteThanks for joining our fortnightly challenge here at Gingerloft Card Challenge. Hope you will join us next time. DT Crafting Vicky
To be honest, I'm not the biggest fan of Alice in Wonderland. Or I should better say - I wasn't. But I think your project is totally stunning and it even made me go "wow" about all the Alice in Wonderland images. Fab work! Hugs! xx
ReplyDeleteWow, fabulous images beautifully coloured. A fantastic project - loved looking at all the pics and the finished product. Thanks for joining in the challenge at Gingerloft this fortnight. Hope to see more of your fab work in future challenges.
ReplyDeleteHugs,
Sandy DT
Awesome project, full of beautifully coloured awesome images. Thank You for joining us at Movie Magic Monthly, Hope to see you again
ReplyDeleteHugs
Suzi
xxx
Stunning. So much work has gone in to this and it's an amazing project.
ReplyDeleteThanks for joining us at Movie Magic Monthly this time.
Absolutely fantastic-you can see every bit of love and work you have put into this wonderful project, a joy to visit your blog! Thank you so much for joining my All Crafts Challenge, I hope to see you enter again soon :-) Elaine-xxx-
ReplyDelete