
Hi all,
First some exciting news, the Rick St. Dennis Challenges will be back again starting May first, see all details, bout rules, freebies and prizes here. First theme is Steampunk so here some inspiration for you :-)
next exciting thing is,
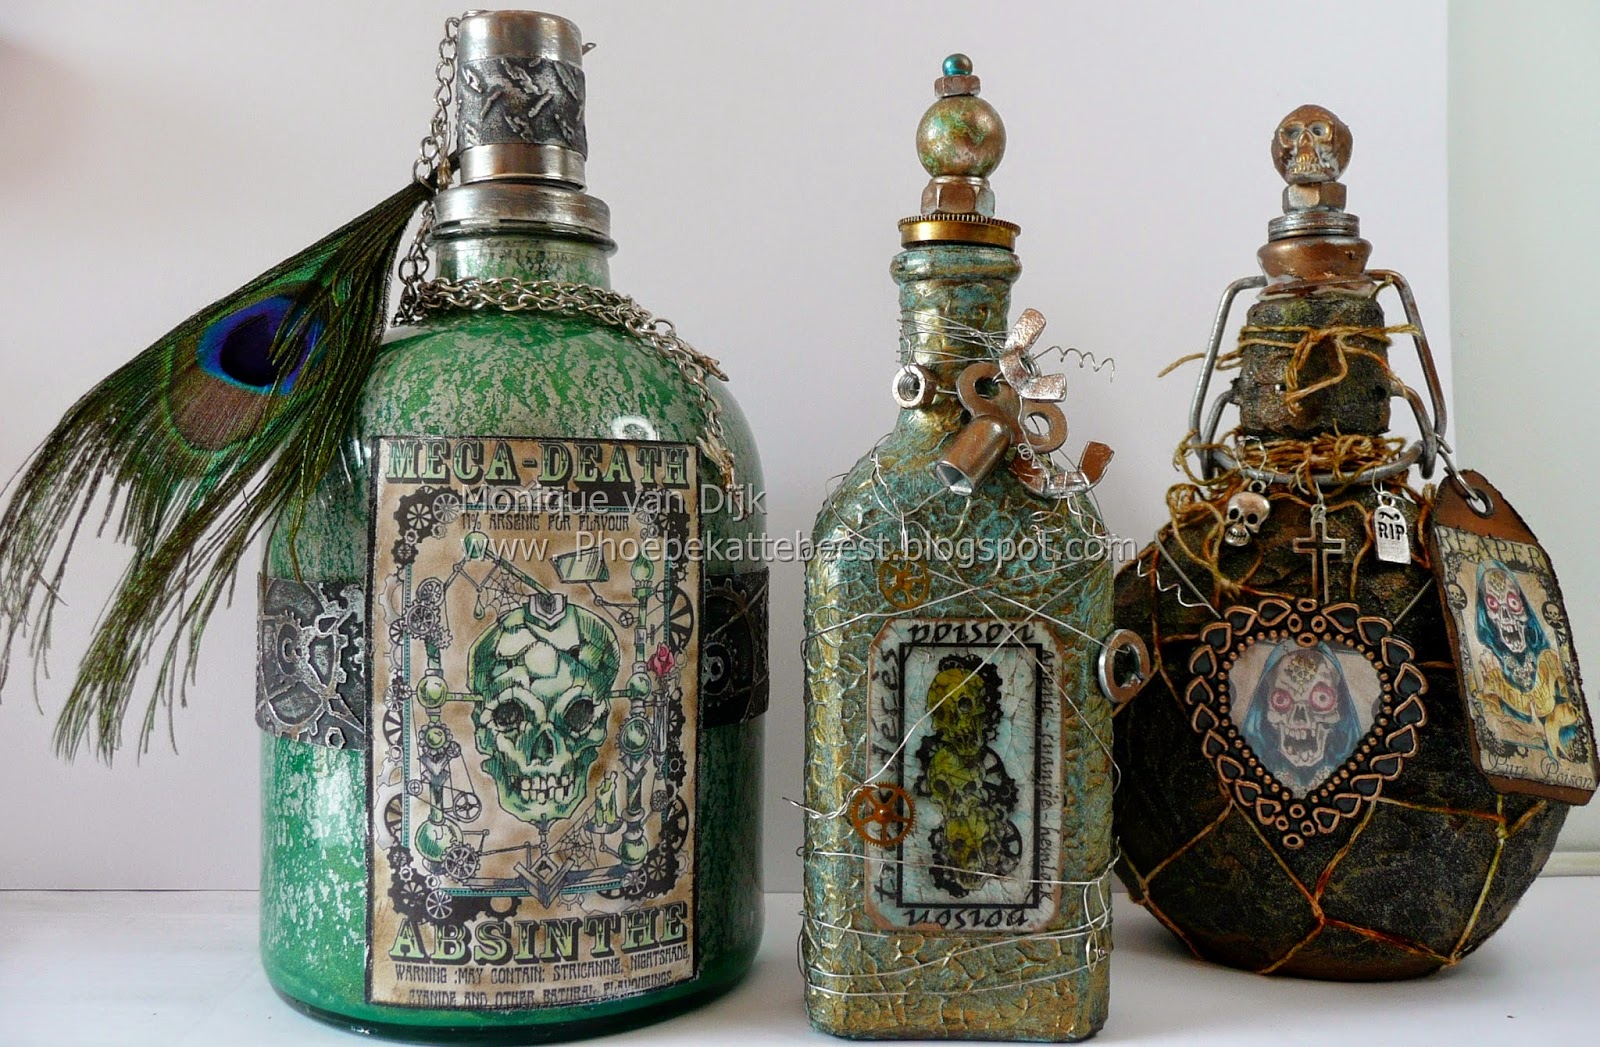
I have been working on some altered bottles, Rick suggested I'd do some bottles, and drew me some labels to go with, and allthough bottles are fun to play with it is pretty hard to paint a them. I had some special texture DecoArt products in my stash some of them were specially made for use on glass. Problem was I had never used it before so I wasn't sure how tings would turn out.
Therefor I thought to work on 3 different bottles at the same time and see which one turned out best to submit to Just Steampunk Magazine vol. 5.
It took some drying time and sometimes I had to change plan a bit, but I really like them all, they are all different but I think they all look good so I submited them all to the magazine and they will all be published :-) in Volume 5 of Just Steampunk magazine, it will be in shops at Scott Publications in August.
I will try to explain what I did in this post. First some pics


supply list:
DecoArt products used:
Americana Decoupage , Elegant Finish Metallics in : Reinassance Brown, Emperors Gold. Texture Fierro in Iron Black and Green Gold. Metallic Lustres in: Iced Espresso, Black Shimmer, Silver Spark. Dura Clear Matte Varnish, Americana Acrylics in Hauser Light Green, Traditiona burnt umber, Decoart Gloss Enamels in Indian Turquoise. Texture glass, Glazing medium.
Tim Holtz embossing folders : Diamond plate and Riveted metal, black cardstock, Silver Metallic spray paint,white glue, kinder toververf, brown cardstock, versamark embossing ink, clear embossing powder, plastic frame, decoration material from hardware store (wire, bolts, nuts etc), a piece of net. Peacock feather. Some broken jewelry and charms, plastic skull, beads, hat pin, glue, Distress ink: Walnt Stain, Broken china, Mustard seed. And the most important thing BOTTLES (any bottle you like will do, just clean them very well before you start)

how to
I worked on all bottles at the same time because there is some drying time involved here and when one bottle is drying you can start with the next. I will explain bottle for bottle, otherwise things will be very confusing. So here is bottle 1

pic above is a before and after pic, just so you can see what I started with and how it turned out.
First remove any original lables on this bottle, and clean it
Apply the Glas texture (use a palette knife andto create some texture), this will dry clear and can be painted using acrylic paint. I use gloss enamel Indian Turqoise because I don't have the colour in acrylic, but that would have worked too. when painted let dry and put a layer matte varnish on and let dry. Next add glazes using emprerors gold and the tratiotonal burnt umber (I colour at a time and let dry in between, you will have to wipe away some of the glaze to rubb it into the texture) When the glazs are dry add another layer of Matte Varnish on to protect the painting.

The stopper is the orignal cork decorated with some clock pieces and bolts, beads and a hat pin to keep them all together.


The label, a Rick St.Dennis Digi is coloured using distress ink, (broken china and mustard seed) to age it use versamark embossing ink and clear embossing powder. Use at least 3 layers of embossing powder (melt in between each layer) and put it in the freeze for 10 minutes, get it out and break the embossing powder, use dome distress ink to rubb into the cracks.
Use foam tape to add it to the bottle, decorate using wire, clock parts and bolts ( age all decorations with metallic lusters)

Bottle 2 (see pic below for before and after)

Remove the cork complete with the iron piece that closes it, remove labels and cover the bottle with a layer of decoupage and let dry.
add the Texture Fierro (black first) using a palette knife (make sure the holes where the iron piece goes stay open) let dry.

Use an old paint brush to dabb some of the green gold Texture Fierro on, let dry and use Reinassance Brown Elegant finishes to age the bottle, just dabb some on random spots very carefully. When dry use the net to wrap the bottle (attache it to the bottle neck and tie it on the back of the bottle) Decorate using the charms. Put the cork back on the bottle with the iron part, Age the cork using Metallic lustress and add some bolts ad the skull (also lustre those )

The label is a Rick St. Dennis digi, coloured using pencils, cut a label using the brown cardstock, add the coloured digi and use some walnut stain to age the label, attache it to the iron part of the cork.
Cut out another coloured RSD digi label and make sure it fits the frame, use some distress to age that image aswell befor you put it in the frame. Attache the frame to the bottle using a chain.

Bottle 3
ok this isn't a real bottle it's an oil lamp LOL see pic below

but now it is an Absinthe bottle

This is the hardest one to paint cause it's painted from the inside and that is har to control.
Start with a mix of white glue and water (50/50) and add Hauser Light Green for colour, poor this in the bottle and twirl till the paint is all over the inside of the bottle (the paint will drop to the bottom of the bottle after a while when you put it aside, just repeat the twirling part till you like the result, poor the rest of the mix out of the bottle and let dry.
Next layer is the silver metallic spray paint (spray the paint in a plastic cup and poor it in the bottle and twirl again, this will stick much easier than the first layer) Last layer is the green paint it's a waterbased paint for kids, called magic paint, it takes a while to dry and it has some gold shimmer in it, poor in the botte and cover the whole inside till you bottle look like mine. Let dry.

color the Rick St. Dennis label and mat it to black cardstock, cut a black cardstock strip to go around the bottle (emboss first, and use metallic lustres to give it a metal look) add it to the bottle and then add the label

see the back of the bottle


add an embossed piece of cardstock to the cap aswell (metallic lustre for metal look) and decorate the bottle using a chain and some charms (I use fairies cuz Absinth is also known as the Green Fairy)
that's it if you have questions please let me know
I will enter the bottles in the following challenges;
http://leftofcenterchallenges.blogspot.co.uk/2014/03/challenge-28-ribbon-andor-flowers-with.html
http://sandee-and-amelie.blogspot.co.at/2014/04/your-favourite-technique-goes-steampunk.html my fav technique is painting bottles
http://www.throughthepurplehazechallenges.blogspot.co.uk/2014/03/steampunk-35.html
http://rheddscreativespirit.blogspot.co.uk/2014/04/april-challenge.html


