Followers

Friday, October 31, 2014

happy Halloween

I have a few projects to show you, starting with a lantern (everyone needs one this night)

I used a lantern I bought it had a text on it in white, I scraped it off using a knife and cleaned the glass using rubbing alcohol.

Then I spayed Deco Art Americana Acrylic Matte Sealer/finisher on the glass, let dry overnight.
Mask the parts you don't want paint on and use chalkboard paint to paint 2 bands leaving the middle part un painted. see pic.


Next use the rubber stamp from the Morte set ( designed by Rick St. dennis available at Smeared Ink) and archival jet black ink to sramp on the glass, careful not to smudge and let the ink dry before touching.  The Sealer makes the glass less slippery so it will be easier to stamp.


this is what it looks like in the dark


cool huh?


Next is an altered box


this started as a cardboard box .
The skull is a Rick St. dennis stamp from the Morte set by Smeared Ink, it was stamped in clay. when dry it was glues to the box cover. The rest of the lid was coverd using Deco Art Modeling paste.

when dry add American Acryloc gesso .

  next is a thin layer of Deco Art Texture Sand. The colour is a mix of Deco Art Media fluids Phtalo Turquoise, Phtalo Green Blue, Paynes grey and Quinacidone gold

last project is a tag using a rubber stamp designed by Rick St. Dennis, calld Skelly ton,  and available at I Brake for Stamps


the back ground is embossed and coloured using Deco Art Metallic lusttres.   Lavish Green for the branch die,The back ground :  Cosmic Blue , Elegant Emerald and Majestic purple


Wednesday, October 29, 2014

Plague

today I have an Art Journal page for you

The image used is a Rick St.dennis digi called Plague he can be found on Etsy too here

The background is a gelli print and I added some stenceling afterwards

The image is coloured using Prismacolour pencils.

Products used for the background :
Deco Art Americana Acrylics  in colours lamp black, spiced pumpkin, red alert, winter blue and  lilac
Stencils used Deco Art Aztec stencil.

The quote is from 'IT" and is handwritten using Deco Art glass paintmarkers in black and white, It says Ï'm everything you were ever afraid of" thought that fitted Mr, Scary Skull well :-)


Tuesday, October 28, 2014

Workshop Andy Skinner

Last Saturday I went to an Andy Skinner workshop in Ede, and learned some cool techniques using the new Deco Art Mixed Media LIne


here some pics of the wallhangers I made there


Products used: Deco Art Media fluid Acrylics , Black and White Deco Art Media Gesso,
Deco Art MediaTinting base, Texture sand paste and Crackle paste. Also used the white Deco Art Media mister and Antiquing creams

The wallhangers are made out of foam board, we used all kinds of dies and embellishments and gave them a crackle or a rusty look.
 the workshop organised by de Craforij took whole Saturday and there were 2 hangers to be made, I made the steampunk one first.


and the second one was the skull hanger, I had some foamboard , die cuts and things left so made another small project.

Thought it turned out pretty cool :-)

Wednesday, October 22, 2014

steampunk canvas galaxy style

another canvas, this time I use an image that is meant to be a Creepmas digi, I don't care, I liked it :-P

The Evil Snowman is called Iceplug Pottersnatch and he can be found on Etsy here, I couldn;t find him in zibbet ,maybe he melted there.


Dragon Fruit, Purple Pizzaz, Ocean Blue, Lamp Black, Snow White.
And Glamour dust glitter paint in Silver Bling


I coloured the dig using prismacolor pencils, and cut it out


Gesso the canvas and paint it black, next take a sponge and go dabb the other paints to create a galaxy look, end the painting part with splattering white paint using an old tooth brush.
When dry add a little bit of glitter paint, just to get a little sparkle here and there.

Stamp the gears using white Stazon, I think it looks a bit like snowflakes :-)

glue the digi on the canas.

Monday, October 20, 2014

macabre monday at HDH and day 20 of the 31 days of Halloween on AC

A double purpose post today, sorry, life got in the way big time so I had to combine a bit, hope you don't mind.

So for the new challenge at Haunted Design House  and my turn on the 31 days posts on Airless Chambers.....

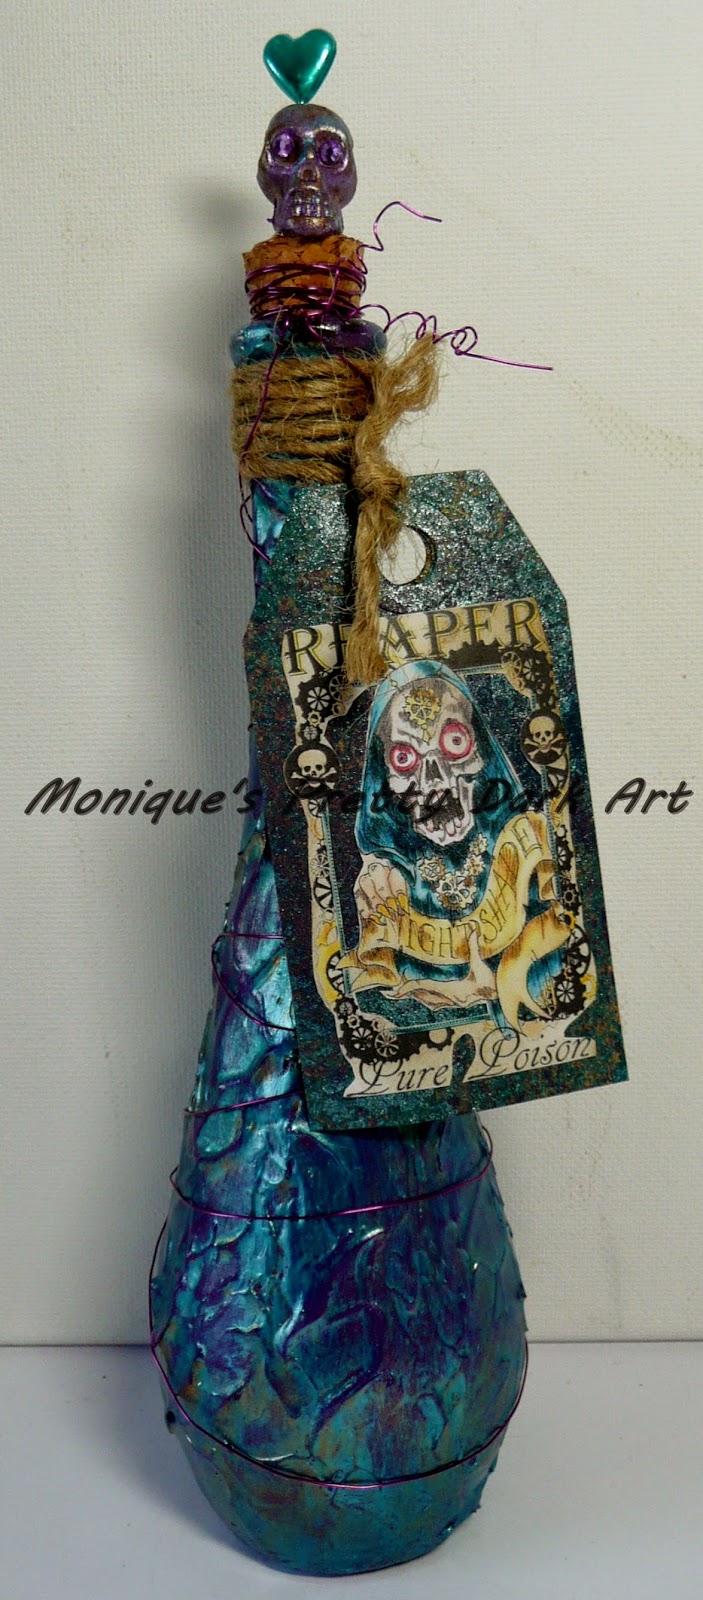
 I made a poison bottle for you, what's Halloween without poison?? Yah see, you absolutely need one......

so first a pic and than the receipe..


Ingredients:
A bottle (just a glass bottle any bottle will do)
Rick St. dennis digi called bottle lables (duh!!!) it's a set of 3 (1 bottle is never enough)

Deco Art products used
Dazzling Metallic paint in colour Teal
Elegant finish metallic paint in Medieval Gold
Metallic Lustres  in Brilliant Turquoise, Majestic Purple and Iced Espesso
Deco Art Media misters in purple and shimmer mister in turquoise
Wire, a plastic skull bead, a heart shaped hat pin, a kraft tag and some rope,  rhinestones


How to make a poison bottle for dummies:

1)  Remove cork (make sure it doesn't get lost) and clean the bottle (I use rubbing alcohol, don't drink the stuff, if you do you will not be able to complete this project).

2) Open the jar of Texture glass and stir, the stuff is white, but the cool thing is, it dries clear.

3) Use a palette knife to apply the texture glass on the bottle, dabb the palette knife on the covered bottle to get the texture, it's easy you can do it, you'll see.

4) Let dry (I just let it stay over night to make sure the thicker parts of the texture glass are dry too, and no,.... don't touch the stuff untill the next day, cuz you'll get finger prints in the texture. You DON'T want your finger prints on a poison bottle, savvy?)


While bottle is drying
Color the digi from the bottle lable set, I used Reaper Pure Poison (why go for less if you can have the pure stuff), 
Use the misters to give the tag a cool look :-) cut out the dig and glue it on the label

Add the metallic lustres (all 3 colors) on the plastic skull (rub with cloth to get more shine in between layers) 
Glue the rhinestones in the skull's eyes and let dry, done for today go do something else f.i. colour a digi, enter the DT call...whatever.....


next day :-)

5) Paint the bottle using the multisurface acrylic in eggplant, and let dry.

6) Paint a layer of Dazzling metallic paint in teal (shake bottle first, the paint bottle, not the one you are altering, well you can shake that too if you want, but it doesn't affect the end result, unless you drop it, in which case you clean up the shards (carefull sharp and you don;t want your DNA all over the place), find a new bottle and start over again), 
 Whipe off on randome spots till you get the result as in pic above. Let dry.

7) Shake the jar of elegant finish in medieval gold (open it)  and use a fan brush to apply a thin layer see pic.

Take a piece of rope and wrap it around the neck of the bottle, and attach the tag to the rope.
put the cork in the bottle 

Put the hat pin through the hole in the skull bead and press it into the cork (the hat pin not the skull)

Take the wire and wrap it around the cork and the bottle end next to the cork and make a nice curl in the wire.

Done, easy peasy, now for the poison.......there are several options, it just depends on what (who) you will be using it on, I suggest to google for the right receipe, it's out there somewhere, I'm sure

hope to see you all again tomorrow enjoy the hop


can;t wait to see your entries in the challenge at HDH

I will enter the following challenges


Wednesday, October 15, 2014

a halloween canvas steampunk style

I made a  canvas using Eeny Meeny a Rick St. Dennis digital stamp, you can find him here


To make the canvas I used Deco Art products
Americana Multi Surface Neon acrylic paint in the colours orange and green
Americana Acrylic lamp black
Metallic Lustre in colour fab fuchsia
Americana decor stencil distressed Harlequin
the gears a a Joy Craft die also use rubber gear stamps and black Archival ink


 I coloured the image using prismacolor pencils, I only coloured the pierrot and left the stars and circle uncoloured because I was gonna cut it out and did not need the stars and circle.

Next Gesso the canvas, when dry add the neon orange. Next use the stencil and the green to greate the harlequin pattern (thought it fit a pierrot lol). Stamp the gears to create a frame and use black paint for the edges. Die cut the gears using black cardstock and add metallic lusttre for some shine.

Cut out the image and glue to the canvas,  easy peasy
Maybe not very scary Halloween to some of you, but clowns/pierrots freak me out so I think it will do :-)


I have some more coloured images to show you, maybe a bit more Halloween

meet Plague (on Etsy here and on Zibbet here ), yah I know....scary name, but hey....doesn't mean he can wear fancy clothes :-)


Next guy is Famine, I guess he could use some food he has been to serious with his diet ,,,
he can be found on Etsy here


Thursday, October 9, 2014

halloween decoration

I used a wooden star to make a Halloween decoration, the stamp used is from the Morte set designed by Rick St, dennis . You can find them at Smeared Ink.


I used Deco Art Texture Crackle, mixed it with Media Fluid acrylics cadmium orange hue and used a palette knife to cover the star. Let it dry and stamped the skull on and the spider webs. Added some sparkle  with Americana Glamour Dust paint in neon orange. Used a black ink pad to make the points of the star a bit darker and left the center neon. Finished with a layer of Triple thick gloss glaze


Tuesday, October 7, 2014

halloween tray


 I made a tray using Halloween Cheer a digi by Rick St.dennis


This is a wooden tray,  it was white and I wanted to make give it halloween colours. First added a layer of  Americana Acrylic Gesso and than I painted it using Deco Art Americana acrylics in the colours Wisteria, Colonial green and spiced pumpkin.
When paint was dry I glued the image on using Decou Page


I will enter this in the following challenges

http://alteredeclectics.blogspot.co.uk/2014/10/another-month-another-challenge.html

Monday, October 6, 2014

Macabre Monday YOU WOOD DO THAT

Monday again so a new Challenge starts at Haunted Design HouseTHEME: YOU WOOD DO THAT - use wood, woodgrain, stakes, coffins, gallows, trees, broomsticks, etc.

so possibilaties are endless :-)


I went for a good old coffin shadowbox. I bought the wooden coffin at Micheals. and used Deco Art products to paint it. First a layer of Deco Art Traditions in colour Naphtol Red Light, stamped the crackle on using Archival jet black ink, Die cutted the celtic cross (TH die) added Deco Art Metallic lustre to it in colours Iced Espresso, Radiant Red an champagne ice. Glued it on the coffin and added a layer of Deco Art Triple thick gloss glaze


 the inside is filled with som pumpkins, skullies a few jars, some bones and a skellie (stamp by TH)

Hope to see you on the challenge soon at HDH