Followers

Thursday, December 17, 2015

creepmas journal page

Today I have a journal page for you, I used the digital image from Rick St.dennis called Yo Mouse no Stirring and I really like these creepy presents (there are losts in Rick's zibbet in the Creepmas section here), they look kinda scary but I am sure they are really very sweet and cute. I wondered why this guy was walking around with a watch but when I got working on the page it all got together, see the quote on the page. :-)  I think it is a very true saying and I guess giving your time to someone or get time from someone is the best gift ever.

Anyway time to get creepy LOL


I coloured the image using Derwent coloursoft pencils, that is why the colors are not that bright, I think Derwent gives a bit of a vintage look and sometimes that is just what I want, that's why I have different sets of pencils, they all give a different result. The image was printed on copier paper and I blended the colours using a paperstump and odourless mineral spirit (but baby oil or vaseline will give same result). I cut the image out and started working on the back ground.

For the background you will need the folowing products  by Deco Art:  Media misters in yellow, orange and purple. Americana acrylics in Red Alert and Festive green, Dazzlng metallic paint in Venetian gold and am Americana stencil called Short Circuit.

The other things I used is a stencil with little stars (mine is from Balzer Designs) the clock backgound stamp is by Kaisercraft and the splatter stamp is by Prima.

I used  A Sharpie to write te quote on a piece of cardstock and coloured it using Mustard Seed distress ink.

The background started out when I cleaned my misters from last use, I usually clean them  by using an empty spray bottle fill that with water and put the spay head I want to clean on that , I spary on empty pages of my journal to use that for backgrounds.

Next I added the clock stamp using Archival ink, took the Short Circuit stencil and gold paint to at some parts of the stencil on my page. It looks real cool and shiny in real life but it doesnt show that well in the pic.
To give it a more Christmas look I used the star stencil and Red and Green paint. I added some splatters by the prima stamp and tadddaaaa the background was done


I glued everyting on the page and made a bit of a shadow underneath the parcels feet using a water soluble crayon ( I love my watersoluble crayons, they are a kiddie brand and they were only 3 Euros for 12 in a cool plastic container and they work soo much better than the Gelatos I have)

Anyway that's it for today, Thanks

Oh if you have some time to spare visit my little shop on Zibbet, I am selling my handmade stuff there, so if you are looking for a prezzie yourself go and have a looksey :-)

I willl enter the following challenges

http://leftofcenterchallenges.blogspot.nl/2015/12/challenge-109110-bumper-christmas.html

http://anythingbutcutechallenge.blogspot.ca/2015/12/challenge-8-youve-got-happy-mail.html

http://smudgyantics.blogspot.co.uk/2015/12/december-2015-anything-goes-challenge.html

http://kleurenmetpotloden.blogspot.nl/2015/12/challenge-december-anything-goes.html

Tuesday, December 15, 2015

snowman and trees

Some more painted canvasses, I am having so much fun doing these small projects, I also opened a Zibbet shop where all of the canvasses can be found. Hoping to see you n my little shop here. Still adding new things there so come visit more often, you might just find something you like :-)

So here I have 2 more canvasses to show you, starting with a cutsey Snowman


DECO ART products used : Americana Acrylic Gesso, Matte Varnish, Americana Acrylics in the colors: Snow white, True Red, Neutral Grey, Spiced Pumpkin, Winter Blue, Lilac, blue Haven.
Glamour Dust  glitter paint in Ice Crystal and Craft Twikles in Crystal. Glass Paint marker in Black


First Gesso the canvas, and next paint the backgroun I used Winter blue and Lilac, Next paint the snow man, he is made of 3 circles, use a round tip brush and dabb Snow white paint to make 3 different size circles. next add neutral grey mixed with white to make the shadows. I drew the hat on using a   glass  paint marker and painted it red and added black stripes with the glass paint marker.
the eyes and buttons are also made using the marker and the carrot nose is painted using Spiced Pumkin. Paint the scarf (true red) and use the marker for the stipes.

Add some snow on the ground and snow flakes, Add glamour dust glitter paint on the snowman and the snowflakes and when that is dry use Craft twinkles over the canvas, finish with matte varnish.


the easel has been painted in Blue haven and some lilac spots, added some sraft twinkle and bling.
Use varnish to protect the paint before you put the rhinestones on. You can find this guy in my Zibbet here


The tree canvas

DECO ART products used : Americana  acrylic gesso , matte varnish, Americana Acrylic paints in Snow white, ocean Blue, Vivid Violet, Festive Green, Glamour dust glitter paint in ice crystal and Craft twnkles in crystal, Glass Paint marker white

canvas size 4 x 4 inch

fo sale in my zibbet here

Gesso the canvas and paint the backgroundn in Ocean Blue and Vivid Violet, next draw the trees and the snow hills using the glass paint marker. Paint it all like in the pic (trees on the outside festive green, middle tree true red, decorate the trees with red or green and paint the snow using snow white and winter blue.

Add glamour dust glitter paint to the snow and Varnish the canvas. Next add rhinestones to the middle tree


I will enter the tree canvas in the following challenge

http://anythingbutcutechallenge.blogspot.ca/2015/12/challenge-8-youve-got-happy-mail.html

I will wnter the Snowman canvas in the following challenge

http://alteredeclectics.blogspot.co.uk/

christmas canvasses

Hi all, I have been painting small canvasses in Christmas style, I think they turned out cute.


DECO ART products used: Americana Gesso, Matte Varnish and Americana acrylics in the colours:
Snow white, True Red, Melon, Coral shell, Lamp black, Winter blue, Festive green, Moon yellow, 
Glamourdust glitterpaint in Ice crystal.

The size of each canvas is 2.5 inch x 2.5 inch, the 3 canvasses are made into a wallhanger by attaching a ribbon with a loop on the back of the canvasses.

You can buy this wall hanger in my Zibbet shop here
To start I gessoed all canvasses, for Santa's head I started by dividing the canvas in 3 parts by painting the red and skin color (I used Corall Shell). Next I used Snow white to paint the furr on the hat and the beard. I shaded the beard a bit using winter blue and dabbed that on (use very little paint , brush needs to be almost dry)
Added a little black on the edge of the furr as shade and painted the eyes and the mouth.
The nose and the cheeks are a mix of Melon and a wee bit red.
When paint was dry I added the Glamour dust glitter paint on beard and fur to give some Christmassy sparkle. Finished the canvas with Matte Varish for protection.


TIP:  if you (like me are not the best painter in the world) would like to be able to rease parts of the painting that did not come out that well, here is a little trick. Just before I need to add the details I firtly adde a layer of matte varnish. Let it dry and it will protect the layers of paint underneath. So before painting on the face I added varnish and mistakes can be erased away using a baby wipe. I did the same on the other canvasses before painting the belt and before adding the highlights to the boots.

Santa's coat,  I started with the true red and painted the whole canvas red, next I painted the fur using Snow white and made it look more furry using Wnter Blue (carefully dabb with almost dry brush)
next I added a bit black on both sides of the fur to shade a bit and painted the belt. The buckle is Moon yellow, and the highlights in the belt are Winter Blue. Added the Glamour dust glitter paint on the furr again and finished with Matte varnish


The boots :  this one was a bit more difficult because the shape of the boots. First I took a drawing pencil and sketched the boots, furr and pants roughly try to do it lightly so it won't show throught the paint. Next start painting all colours to the sketch you made, Pants red,  boots lamp black (I painted around the edges so the boots go around the corner,  I thought that would be a fun idea), make the back ground Festive Green) Let the paint dry. Next paint the furr on the boots, Let dry and add matte varnish as protection layer for possible mistake s(lol)  and let dry .  Next you need to start adding shades and highlights to give everything a bit of shape,

I used black to add the shade of the furr to the trousers, this gives a bit depth. Next the legs need to be separated because in this stage they are just a red triangle like shape. So use a little black paint to split the triangle in the middle and fade it out a bit (from the middle to the outsides. On the outsides of the legs also use a bit blackand let it fade into the middle. This gives the legs a bit shape.
Where the two furr parts come togheter there needs to be some shade to just as on the outside curves, and the furr needs to look fluffy so dabbing is the trick, I used Winter Blue for shading the furr.
Next the boots, use highlight on the black to create a boot shape, Just look at the picture to see what I mean, I used Winter Blue for the highlights on the boot

Finally finish the canvas with another layer of Matte Varnish


Wednesday, December 9, 2015

creepmas shrine

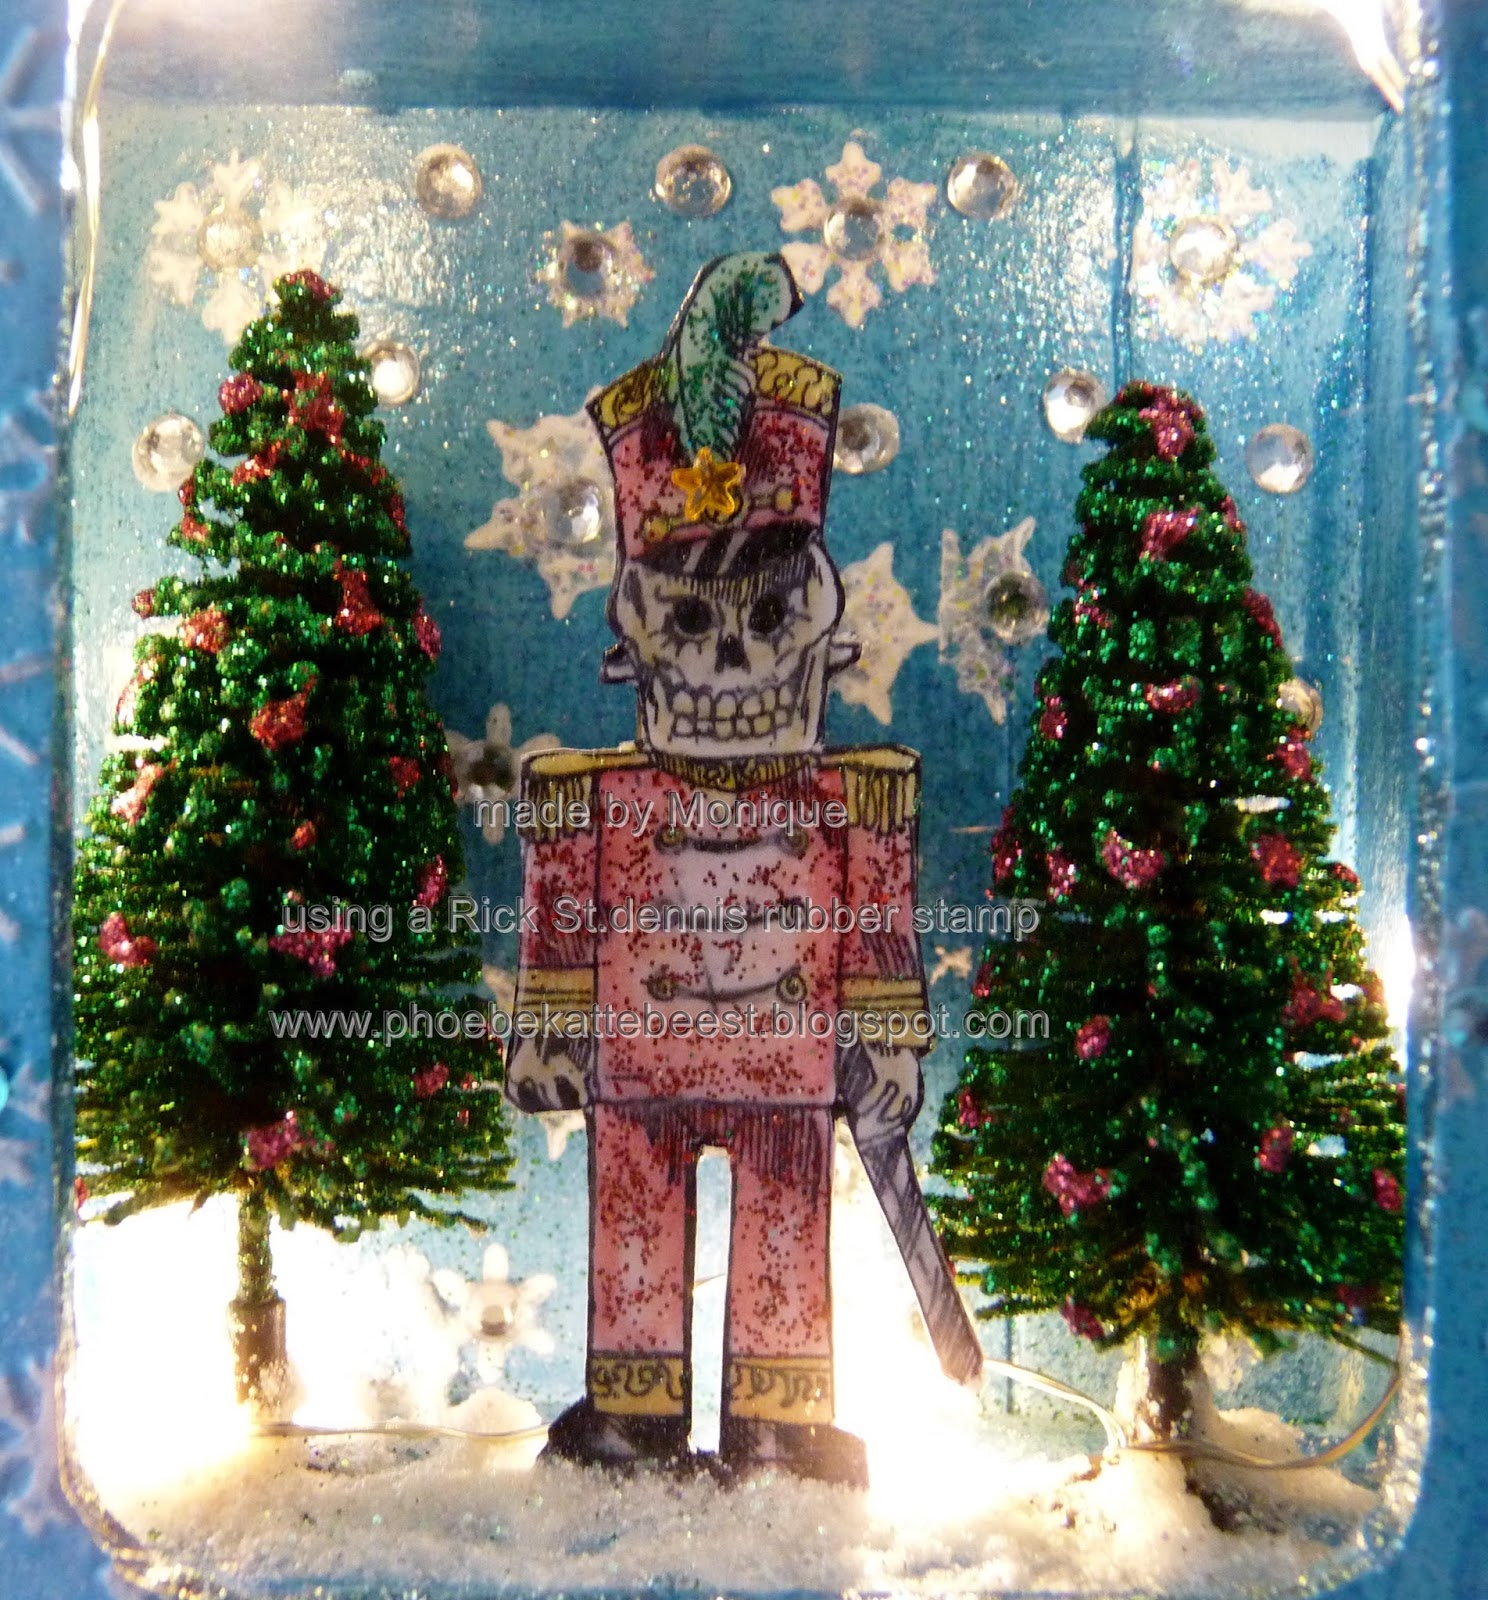
For the 12 days of Creepmas hop over at Airless chambers I made this Creepmas Shrine


Stamp used: The Skullie nutcracker by Rick St.dennis  is a rubber stamp by Smeared Ink, but now only available as digi on the Dark Holidaze sheet
Deco Art products used : Metallic Lustres in Silver Spark and Brilliant Turquoise. Craft twinkles in Christmas Green, Christmas Red and Chrystal . Glamour Dust Glitter paint in Turquoise and Emerald. Americana acrylics  in Titanium white and Indian Turquoise.  Dazzling Metallics in Shimmering Silver, Triple thick Gloss Glaze , Glistening Snowtex and Gesso.


The shrine is made of 2 wooden frames a wooden box and a piece of chipboard.

First Gessoed all parts and painted them turquoise, added glitter paint and next traced one of the frames onto paper to cut out and emboss (Cutlebug embossing folder Snowflakes), also painted the paper and used metallic lustre on the embossed parts
 The pentacle is made of rhinestones, was a bit of a puzzle but I think it looks great as a creepmas star

The cross is a charm, it's upside down ofcourse....duh!  I mean,  CREEPMAS!! all Creepmas crosses are upside down aren't they?
 The nutcracker was stamped on paper, and coloured, I used glitter paint to give him some bling and a shine star rhinestone to put on his hat. After that I used 2 layers of triple thick gloss glaze to give it a more nutcracker varnished wood look.


 The trees are normal trees from my hubbies model train, I borrowed them :-)   and put lots of glitter on them to decorate (I don;t think hubby wants them back now LOL)
The snow flakes are stamped using white americana paint and they have rhinestones added. there is glitter paint in the inside walls of the shrine too
 I added some battery operated christmas lights to give it some extra cheer    errrmmm I mean CREEP

 to get some extra bling I added tinsel and silver painted, glittered skullies with real candles on their heads (candles and skulls are a must for a Creepmas shrine, everybody knows that)
 To give the scene a frozen look I added turquoise glitter glue to the edges and glistening snowtex on the ground......very creepmassy :-)   (I can just hear the nutcrackers scary voice sing "Let it go")
 O forgot to tell you, the embossed snowflakes on the frame have rhinestones too
 just like the eyes of the skull candle holders :-)

that's about it,  just paint glitter and rhinestone away and you have a blingy creepmas shrine, this one is made for the Sparkle challenge on Rick;s fans and friends facebook group..........cuz you did not think I would use that much glitter and bling on my own  would you???    there goes my dark reputation  lol


I will enter the following challenges


Tuesday, December 8, 2015

christmas canvas

I made a small Christmas canvas, just for fun, I painted a funky Christmas tree and some snowflakes.

It turned out much cuter than I thought , I kinda like it.


Decoart product used: Americana acrylics in Red Alert, Snow White, Blue Grass Green. Matte Varnish, Gesso. Craft Twinkles inCrystal and Christmas red. Glamour dust glitter in  Ice Crystal. Paper efftects in Black Pearl. Traditions acrylic in Phtalo Blue and Red Violet. Decou Page Crystal Glitter


First I gessoed the canvas, let it dry and added some water to the Traditions paint in  Blue and Violet. I used the paint water mix to make the background,  The water makes it easier for the colours to mix a bit and makes the colours a bit lighter.

Next I used a glass paint marker in white to draw the x mas tree and coloured it white so I would have a white background to paint the tree on.  I also used the marker to draw the snowy hills the tree stands on.

Than I used the green to paint the tree and red and white  for the tree trunk. The snowflakes a dots made with a small paint brush and white paint. I mixed white with water to make the hills look more snow like (I wanted some of the blue and violet to shine through there). The snow also got a bit of Glamour Dust glitter paint in Ice Crystal.

I usde mattr varnish over the entire canvas at this point, because it would protect the painting so far just incase I needed to use a babt whipe in case I would mess up the decorating part of the tree :-)

I decorated the tree with red paint and added Craft Twinkles in Christmas red to give it a more xmassy look.

Next I added Craft Twinkles in christal all around the tree using a paint brush.

To make the tree stand out more I used paper effects in black pearl to outline the tree.  Let it dry

The words Peace and Joy are stamped using black archival in on paper,  I used red  distress ink to match the paper with the canvas.

The words were cut out and glued onto the canvas using Decou Page Crystal glitter. To finishe I gave the canvas another layer of Decou Page Crystal glitter

Thursday, December 3, 2015

Tags and ATC's

I have made some tags and ATC's for the Altered Start Facebook group, it is a fun group that organizes all kinds of swaps, so if you want to join send me a message.

These will be going in the mail to USA and I hope the one receiving them will like them. I had fun playing


Autumn colors ATCs, Deco Art Products used : Triple Thick Gloss Glaze, Deco Art Media Antiquin Cream, Crackle Glaze, Glamour Dust Glitter Paint copper. Deco Art traditions in Napphtol Red light and Hansa Yellow, Phtalo Green Blue.


The ATC with the tree: the tree is a rubber stamp by the stempelwinkel, the background is distress ink.  There are some leaves stamped in the background using distress ink too. Next was a layer of matte varnish to protect the ink. Than I added some Crackle glaze and rubbed antiquing cream in the cracks. To protect I used Triple Thick Gloss and put some Glamour Dust  glitter paint around the edges.  

The Atc with the Leaf:  the leaf is a punch and I used an old English Dutch dictionary to punch the leaf out. I used the page with the word "herfst" is autumn in Dutch. Inked and stamped the leave and for the  background I used a  piece of carboard, that I painted in yellow, red and green using Taditions paint, to mat the leaf. Decorated with twine and a charm.


Spooky Tag (Autumn colours my way lol)

The tag below is inked using distress ink and has stamps and embossing powder on it
The Skellie stamp  and bats is by the Stempelwinkel


Umbrella man Tag in Autumn colours:
The Autumncolor tag with umbrella man is made using a lot of Deco Art Goodies, it has so many layers.
Products used: Antiquing cream in titanium white and patina green. Weathered Wood Crackle medium, Media Crackle Glaze, Metallic lustres: in copper Kettle and Elegant Emerald. Matte varnish, Media Shimmer mister in turquoise. Traditions  paint in: Naphtol Red light, Phtalo Green Blue, Hansa Yellow and Titanium White. Media fluid acrylics in cadmium red hue, Diarylide Yellow and Cadmium Orange HUe

I started with the Media fluids and a spiderweb stencil by Dutchdubadoo to create the background.  Next I misted some Turquoise shimmer mister to get a bit of a rain effect. And I stamped the text using Traditions acrylic paint in Titanium White(Stamp is Ikadinkado) next was a layer of Crackle glaze and antiquing cream in Patina Green.  To protect the antiquimimg cream I added a layer of matte varnish..The crackle glaze cracks are hard to see in the picture and the antiquing cream helps to show them better.
Next I die cutted the umbrella man from a Tim Holtz die, using chipboard, added the Traditions paint in Red green and yellow and than Weathered wood, top layer is lamp black Americana paint and when that dried I gave it a layer of matte varish. Next layer is again Crackle Glaze and Antiquing cream in white.  finished with some Matte Varnish again and glued it onto the tag after I did some decorating along the edges of the tag using stamps and embossin powder.   To FinisH I added a ribbon a charm and the metal corners. the Spiderweb at the top of the tag is a die and it has metallic lustre on it to make it match the rest of the tag.


Deco Art products used: Americana acrylics in Winter blue, Spa Blue, Neutral Grey,  Lamp Black and Traditions in Ultramarine blue. Also used Pearlizing medium to give some shimmer to the blue.
the winter wishes ARC was painted black firs,t next I stamped the snowflakes using embossing ink and holographic embossing powder. Over the embossed stamps I rubbed a mix of Spa Blue Americana acrylic  and Winter  Blue Americana acrylic, let dry a bit and rubb over the raised parts of the embossing using a baby wipe,  so the holographic powder with the black  back ground shines through.  You can't see the sparkle on the pic but it is there :-)

The other tag is stamped using blue acrylic paint and has some layers of chipboard and cardboard, all painted in blues and greys. The show flake is plastic and has glitter on it. I finished with some ribbon and pearls.


Winter colour tags

Winter Tags,  Deco Art products used: Americana Acrylics in Neutral Grey, Winter Blue, Hauser Dark Green, And Glistening Snow writer. The Paris tag is : Americana acrylic in Spa Blue, Lamp Black, Winter Hue.
For the Paris tag I painted the tag black and used holographic embossing powder to stamp the Eiffel tower and swirls. Gave it the same treat ment as the Winter wishes ATC above. And did some extra stamping using lamp black Americana Acrylics to stamp with ( use a bayer to get a smooth layer of black paint on a glass plate, press the stamp in and stamp like you would with ink, cleans stamp immediately after stamping, because if the paint dries on your stamp it will be hard to clean it off again)

The Bambi tag:
Bambie is a clear stamp, used stazon in Rust to stamp it on the tag and masked it. The trees in the back ground are stamped using Americana acrylic paint in Hauser dark green. The path is a rubber stamp by the Stempelwinkel (can't find it in their store right now,)  and so is the moon with clouds. The birds are a rubber stamp from de Stempelwinkel (plate dark boundaries) too. the sky is Distress ink and the path stamp has some snow tex and grey painted details on it. The snow flakes are Glistening Snowtex by Deco Art.

I will enter the Bambi tag in the following challenge

http://destempelwinkelstampers.blogspot.nl/2015/11/de-stempelwinkel-stampers-challenge-20.html

Tuesday, December 1, 2015

RSD progressive challenge December

Today the new challenge starts at Sparkle and Glitter, we of the RSD EDT all used the prize image for the entries of the first part of the challenge can get for free, but if you missed the first part of the challenge the image is in the shop too.

With Creepmas starting today it's obvious the image is a fun little prezzie with some sharp teeth, so be careful unwrapping, it can bite you know. For Creepmas lovers Rick has a new colouring book all Creepmas themed and Airless Chambers is in the 12 days of Creepmas hop, so if you need inspiration you know where to go.

I used the fun prezzie guy to make an AJ page.

 The digi used is called Take yer Pick and you can find him here.  DECO ART products used:
Media Shimmer misters in orange, white and violet, Media mister in purple. Traditons acrylic paint in Hansa Yellow and Ultramarine Blue. Americana stencils: pixelated and beliefs (Urban Ink, Personally Yours stencils by Deco Art. Glass paint markers in black and white.
The image was coloured using Crayola pencils

 For the background I used a page I had allready put some mister ink on,  When I clean my misters I spray the nozzles clean using a clean bottle filled with water and spray till clear water gets out of the nozzle. I use my journal to spray on that way I get a base of funky colours and no ink goes to waste
:-)
 Nect I used stencils to make the dots and the stars, i used acrylic paint and a kitchen sponge to dabb.

The quote is found on the internet and written with Deco Art Glass paint markers, I know they are supposed to be used on glass, but I found out they write over almost any surface, and acrylic paint is not an easy background to write on. These markers do a great job. :-)


The image is coloured using Crayola pencils and cut out and glued on the page, I gave his feet a bit of a shadow underneath using a black Gelato and used my finger to blend it in right shape.


We can't wait to see your entries using Take yer Pick, and don;t forget to check out Airless Chambers and the Zibbet shop for all digi and coloring books